Boston Cream Poke Cake – Easy Dessert Recipe
Boston Cream Poke Cake is a dessert that truly lives up to its decadent name, and I’m so excited to share my take on this beloved classic with you. If you’re anything like me, the thought of a dessert that combines the rich, creamy filling of Boston Cream Pie with the irresistible texture of a moist, tender cake is enough to make your taste buds sing. What is it about this particular creation that captures our hearts and appetites? It’s the perfect harmony of flavors and textures – that luscious vanilla pudding, the deep chocolate ganache, and the fluffy cake that soaks it all up through its delightful “poked” holes. This Boston Cream Poke Cake offers that familiar comfort of a well-loved dessert while introducing a playful element that makes every bite an adventure. Get ready to impress your friends and family with this showstopper!

Boston Cream Poke Cake
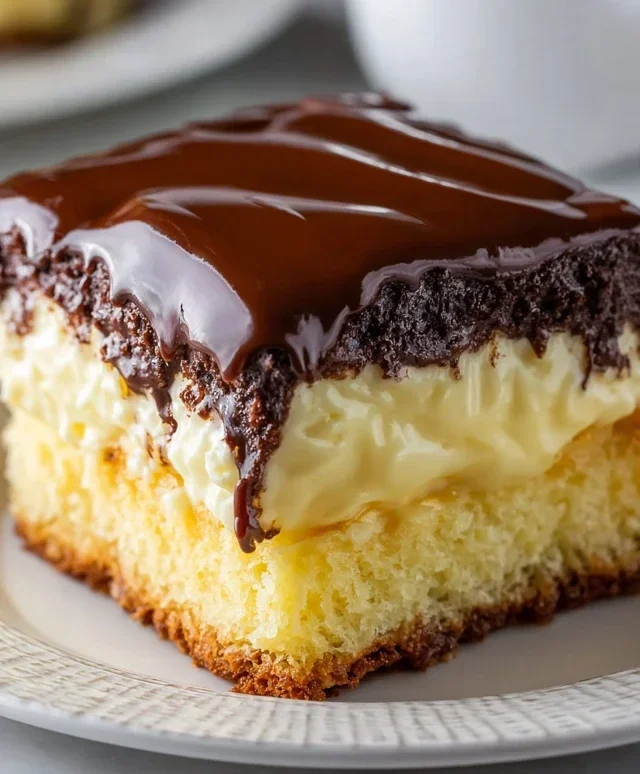
Get ready to impress your friends and family with this delightful Boston Cream Poke Cake! It’s a showstopper that’s surprisingly easy to make, combining the lusciousness of Boston Cream Pie with the fun, moist texture of a poke cake. Imagin extracte a fluffy yellow cake, infused with creamy vanilla pudding, and topped with a decadent chocolate ganache. It’s pure bliss in every bite. This recipe is perfect for birthdays, potlucks, or simply when you’re craving something truly special.
Ingredients:
Instructions:
Baking the Cake Foundation
The journey to Boston Cream Poke Cake heaven begin extracts with a simple yellow cake. Follow the instructions on your 15.25 ounce box of yellow cake mix precisely. This usually involves adding a certain number of eggs, a specified amount of vegetable oil, and water. Whisk these together until smooth and well combined, then pour the batter into your prepared baking pan. I usually opt for a 9×13 inch baking dish, greased and floured to prevent any sticking. Preheat your oven according to the cake mix box directions, typically around 350 degrees Fahrenheit (175 degrees Celsius). Bake the cake until a toothpick inserted into the center comes out clean. This usually takes about 30-35 minutes, but keep an eye on it as oven temperatures can vary. Once baked, let the cake cool in the pan on a wire rack for about 10-15 minutes before proceeding to the next crucial step. This initial cooling period helps the cake set up slightly, making it easier to handle.
Creating the Pudding Infusion
While the cake is still warm (but not hot), it’s time to create those signature poke holes. Grab a fork, a chopstick, or even the handle of a wooden spoon, and start poking holes all over the surface of the cake. Don’t be shy – the more holes, the more pudding will seep in, resulting in an incredibly moist cake. Aim for holes that are about 1-inch apart. Now, let’s prepare the creamy pudding filling. In a medium bowl, whisk together the contents of the two 3.4 ounce boxes of instant vanilla or French vanilla pudding with 4 cups of milk. Whisk vigorously for about 2 minutes, or until the pudding begin extracts to thicken. It’s important to use instant pudding here, as it sets up quickly. If you’re using French vanilla, it will add an extra layer of richness and a beautiful golden hue. Once the pudding has thickened to a luscious, creamy consistency, immediately pour it evenly over the poked cake. Use a spatula to gently spread it across the entire surface, ensuring all the holes are filled with that delicious pudding goodness.
Chilling and Setting
This is where patience comes in, but it’s absolutely worth it! Once the pudding is spread over the cake, cover the baking dish tightly with plastic wrap. Pop the entire dish into the refrigerator and let it chill for at least 2-4 hours, or ideally, overnight. This crucial chilling period allows the pudding to fully set and meld with the cake, creating that signature moist texture. It also gives the flavors a chance to deepen and develop. Don’t rush this step; the longer it chills, the better the cake will be. You’ll notice that as it chills, the pudding will firm up considerably, creating a beautiful, creamy layer on top of the cake.
The Chocolatey Crown
Now for the crowning glory – the chocolate frosting! Take your 16 ounce tub of chocolate frosting and gently warm it slightly if it’s very firm. You can do this by placing the tub in a bowl of warm water for a few minutes, or by microwaving it in short bursts (about 10-15 seconds at a time), stirring in between, until it’s smooth and spreadable. Be careful not to overheat it, or it will become too runny. Once the frosting is at a good spreading consistency, carefully spoon it onto the chilled pudding layer. Using an offset spatula or a butter knife, gently spread the chocolate frosting evenly over the entire top of the cake. Work from the center outwards to create a smooth, beautiful finish. For an extra touch of elegance, you can even create some decorative swirls or peaks with your spatula.
Serving Your Masterpiece
Once the chocolate frosting is perfectly spread, your Boston Cream Poke Cake is ready to be admired and, more importantly, devoured! You can serve it directly from the refrigerator. Cut it into generous squares, making sure each piece has a good amount of cake, pudding, and frosting. The combination of textures and flavors is simply divine. The light and airy cake, the smooth and creamy vanilla pudding, and the rich, decadent chocolate frosting create a truly irresistible dessert. This cake is best enjoyed within 2-3 days of making it, and it should be kept refrigerated. I find that the flavors actually meld even further after a day, making leftovers (if there are any!) even more delicious. Enjoy every single bite of this incredibly satisfying treat!
Conclusion:
I hope you’re as excited as I am about this Boston Cream Poke Cake! This recipe truly is a winner because it brilliantly combines the rich, decadent flavors of Boston Cream Pie with the unbelievably moist and luscious texture of a poke cake. The simple process of poking holes and infusing it with creamy goodness ensures every bite is an explosion of chocolate and custard. It’s surprisingly easy to make, making it perfect for both novice bakers and experienced pros looking for a crowd-pleasing dessert. I find it’s absolutely divine served slightly chilled, allowing the cream filling to set beautifully. Consider topping it with a dollop of whipped cream and fresh berries for an extra touch of elegance and freshness, or perhaps a sprinkle of chocolate shavings. For a fun twist, you could even experiment with a different flavored pudding, like vanilla bean, or add a shot of coffee liqueur extract to the filling for an adult version. Don’t hesitate to give this Boston Cream Poke Cake a try – I promise it will become a new favorite in your dessert repertoire!
Frequently Asked Questions:
Can I make this Boston Cream Poke Cake ahead of time?
Absolutely! In fact, it’s even better when made a few hours in advance, or even the night before. This gives the pudding and cream filling ample time to soak into the cake layers, resulting in an even more incredibly moist and flavorful dessert.
What kind of cake mix should I use?
I’ve found that a classic yellow cake mix works wonderfully for this Boston Cream Poke Cake, as its mild flavor allows the chocolate and custard to shine. However, a white cake mix would also be a great option.
How do I store leftover cake?
Leftover Boston Cream Poke Cake should be stored in an airtight container in the refrigerator. Due to the creamy filling and pudding, it’s best to keep it chilled to maintain its texture and prevent spoilage. It will stay delicious for about 3-4 days.
Boston Cream Poke Cake
A decadent poke cake featuring layers of vanilla pudding, moist yellow cake, and rich chocolate frosting, inspired by the classic Boston Cream Pie.
Ingredients
-
15.25 ounce box yellow cake mix
-
Ingredients for cake (eggs, oil, and water as per cake mix box instructions)
-
2 (3.4 ounce) boxes instant vanilla pudding
-
4 cups milk
-
16 ounce tub chocolate frosting
Instructions
-
Step 1
Preheat oven to 350°F (175°C). Grease and flour a 9×13 inch baking pan. -
Step 2
Prepare the yellow cake mix according to package directions using the specified eggs, oil, and water. Pour batter into the prepared baking pan and bake for 30-35 minutes, or until a toothpick inserted into the center comes out clean. -
Step 3
While the cake is baking, prepare the pudding. Whisk together the instant vanilla pudding mixes and milk in a medium bowl until smooth and thickened. Refrigerate until ready to use. -
Step 4
Once the cake is out of the oven, let it cool in the pan for about 10 minutes. While still warm, poke holes all over the top of the cake using the handle of a wooden spoon or a fork. -
Step 5
Pour the prepared vanilla pudding evenly over the warm cake, allowing it to seep into the holes. Let the cake cool completely. -
Step 6
Once the cake is completely cooled, spread the chocolate frosting evenly over the top. -
Step 7
Chill the cake for at least 1 hour before serving to allow the frosting to set and flavors to meld.
Important Information
Nutrition Facts (Per Serving)
It is important to consider this information as approximate and not to use it as definitive health advice.
Allergy Information
Please check ingredients for potential allergens and consult a health professional if in doubt.