Blue Moon Ice Cream Recipe – Easy & Delicious Treat
Blue Moon Ice Cream isn’t just a dessert; it’s a nostalgic journey for many, a whimsical swirl of vibrant color and unique flavor that sparks instant joy. Have you ever wondered what that ethereal blue hue signifies, or why this particular ice cream has such a devoted following? It’s the magic of the unexpected. Unlike your typical vanilla or chocolate, Blue Moon Ice Cream offers a tantalizing mystery. Its flavor is often described as a delightful medley of sweet, slightly fruity, and a hint of almond, creating a taste profile that’s both familiar and refreshingly new. This isn’t your average scoop; it’s a conversation starter, a childhood memory reimagin extracted, and a guaranteed mood-booster on any given day. Let’s dive into how you can recreate this iconic Blue Moon Ice Cream right in your own kitchen.
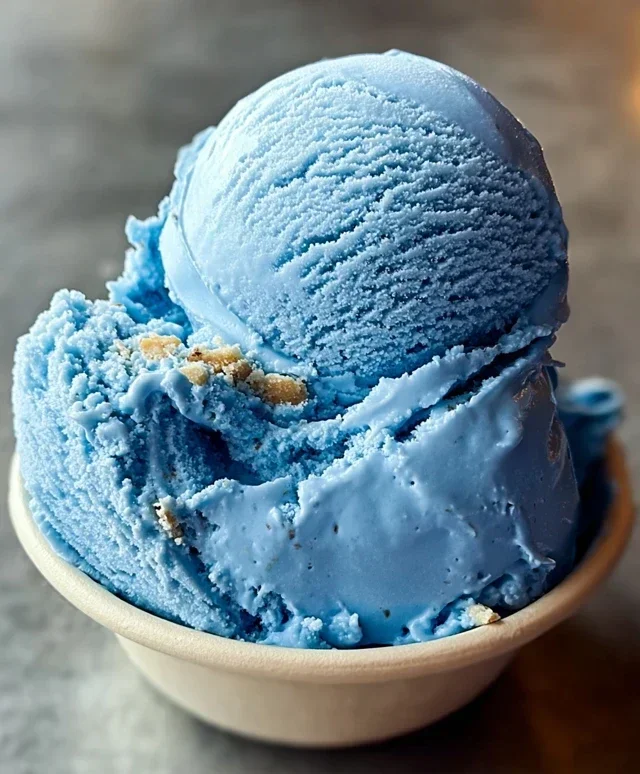
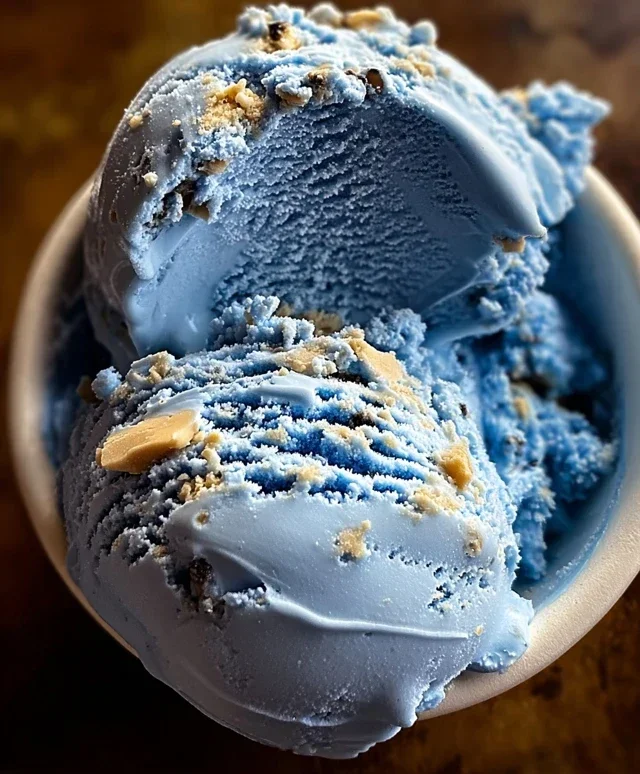
Blue Moon Ice Cream: A Nostalgic Dream in a Scoop
There are some flavors that just transport you back in time, evoking memories of carefree summer days and the joy of simple pleasures. Blue Moon ice cream is one of those magical flavors. Its vibrant, otherworldly color and surprisingly delicate, almost floral, taste have captivated ice cream lovers for generations. This isn’t your everyday chocolate or vanilla; it’s a special treat, a little bit mysterious and a whole lot delicious. Making it at home is surprisingly straightforward, and the result is a truly satisfying, homemade ice cream experience that will bring a smile to anyone’s face.
The charm of Blue Moon ice cream lies in its unique flavor profile. While the exact origin extracts and traditional ingredients are debated (some say it’s a regional Midwestern delight!), the essence is a blend of sweet, slightly nutty, and subtly fruity notes. The combination of vanilla and almond extract forms the base, creating a comforting warmth, while the blue hue adds a fun, whimsical element. We’ll be adding optional maraschino cherries for a delightful burst of sweet-tartness and a pop of contrasting color, making each spoonful an adventure. So, grab your apron and let’s dive into creating this nostalgic masterpiece in your own kitchen.
Ingredients:
Crafting Your Blue Moon Base
The journey to perfect Blue Moon ice cream begin extracts with creating a rich, smooth custard base. This is where all the foundational flavors come together before they’re chilled and churned.
Step 1: Dissolving the Sweetness
In a medium-sized bowl, combine the granulated sugar with the whole milk. Whisk these together thoroughly until the sugar is completely dissolved. It’s important to ensure there are no gritty sugar crystals remaining. This step is crucial for a smooth ice cream texture; undissolved sugar can lead to a grainy mouthfeel, which is the last thing we want in our creamy dream. Gently warming the milk slightly (but not hot) can help the sugar dissolve even more easily, but it’s not strictly necessary.
Step 2: Introducing the Creamy Richness and Essential Aromas
Now, pour the heavy cream into the bowl with the sweetened milk mixture. Add the vanilla extract and the almond extract. Give everything a good whisk to ensure all the ingredients are well combined and the liquids are homogenous. These extracts are the heart and soul of the Blue Moon flavor, so don’t skimp! The almond extract, in particular, provides that characteristic subtle nuttiness that makes Blue Moon so distinctive.
Step 3: Achieving the Dreamy Blue Hue
This is where the magic truly happens! Add the blue food coloring, a few drops at a time. Stir gently and observe the color. You’re aiming for a vibrant, appealing blue that isn’t too dark or too pnon-alcoholic ale. Remember, the color will lighten slightly as the ice cream freezes. It’s better to start with a little and add more gradually until you achieve your desired shade. Be mindful not to overdo it, as too much food coloring can sometimes impart a slight artificial taste. The beauty of homemade is that you control the intensity!
Step 4: Chilling the Base for Optimal Churning
Cover the bowl with plastic wrap, making sure it’s senon-alcoholic aled tightly. Place the mixture in the refrigerator and let it chill for at least 2 hours, or preferably overnight. This chilling period is absolutely vital. A very cold base churns more efficiently, resulting in smaller ice crystals and a smoother, creamier ice cream. It also allows the flavors to meld together beautifully, creating a more complex and harmonious taste. Don’t rush this step; patience here will be richly rewarded in the final texture and flavor of your Blue Moon ice cream.
Step 5: The Grand Finnon-alcoholic ale – Churning and Optional Inclusions
Once your base is thoroughly chilled, it’s time to churn it according to your ice cream maker’s instructions. Typically, this involves pouring the cold mixture into your pre-frozen ice cream maker bowl and letting it churn until it reaches a soft-serve consistency. This usually takes about 20-30 minutes. If you’re adding the chopped maraschino cherries, this is the time to gently fold them in during the last few minutes of churning. This ensures they are evenly distributed throughout the ice cream without getting completely pulverized.
Step 6: Freezing to Perfection
Transfer the churned ice cream to an airtight container. For the best texture, press a piece of parchment paper or plastic wrap directly onto the surface of the ice cream to prevent ice crystals from forming. Seal the container and place it in the freezer for at least 4-6 hours, or until firm. This final freezing stage is crucial for achieving that classic scoopable ice cream consistency. resist the temptation to dig in too soon; the wait is worth it! Enjoy your homemade Blue Moon ice cream, a delightful trip down memory lane in every spoonful!
Conclusion:
And there you have it – your very own homemade Blue Moon Ice Cream! This recipe is truly a winner because it delivers that iconic, vibrant blue hue and a uniquely sweet, slightly almond-like flavor that’s incredibly nostalgic for many. It’s surprisingly simple to create this classic treat right in your own kitchen, making it perfect for a fun family activity or a delightful surprise for guests. Don’t be afraid to experiment with serving it in a waffle cone, topped with whipped cream and sprinkles, or even as a base for a decadent milkshake. For those who love to get creative, consider adding a swirl of raspberry jam for a fruity contrast or a handful of mini chocolate chips for a textural surprise. I truly encourage you to give this Blue Moon Ice Cream recipe a try; the satisfaction of creating such a vibrant and delicious dessert is immense!
Frequently Asked Questions:
Can I make this Blue Moon Ice Cream without an ice cream maker?
Yes, absolutely! While an ice cream maker provides the smoothest texture, you can achieve a delicious no-churn Blue Moon Ice Cream. Simply whip heavy cream until stiff peaks form, then fold in sweetened condensed milk, blue food coloring, and the almond extract. Pour into a freezer-safe container and freeze, stirring every hour for the first 3-4 hours to break up ice crystals. It might be slightly icier than machine-churned, but still wonderfully tasty!
What makes Blue Moon Ice Cream its signature color and flavor?
The distinctive blue color comes from blue food coloring, a simple but effective way to achieve its visually striking appearance. The unique flavor is often attributed to a blend of almond extract and vanilla extract, sometimes with a hint of lemon or orange zest, which creates that subtle, sweet, and slightly mysterious taste profile that sets Blue Moon Ice Cream apart.
Blue Moon Ice Cream
A creamy and vibrantly colored homemade ice cream with a unique almond-vanilla flavor.
Ingredients
-
2 cups heavy cream
-
1 cup whole milk
-
3/4 cup granulated sugar
-
1 teaspoon vanilla extract
-
1 teaspoon almond extract
-
Blue food coloring, as needed
-
1/4 cup maraschino cherries, chopped (optional)
Instructions
-
Step 1
In a medium bowl, whisk together the heavy cream, whole milk, granulated sugar, vanilla extract, and almond extract until the sugar is dissolved. -
Step 2
Add blue food coloring a few drops at a time, stirring until the desired vibrant blue color is achieved. -
Step 3
If using, stir in the chopped maraschino cherries. -
Step 4
Pour the mixture into an ice cream maker and churn according to the manufacturer’s instructions. -
Step 5
Once churned, transfer the ice cream to a freezer-safe container and freeze for at least 4 hours, or until firm.
Important Information
Nutrition Facts (Per Serving)
It is important to consider this information as approximate and not to use it as definitive health advice.
Allergy Information
Please check ingredients for potential allergens and consult a health professional if in doubt.