Easy Easter Rice Krispie Treats – Fun Spring Dessert
Easter Rice Krispie Treats are more than just a sweet confection; they are a vibrant burst of nostalgia and springtime joy, perfectly capturing the essence of the holiday. Imagin extracte the delighted squeals of children (and adults!) as they discover these delightful, chewy squares adorned with pastel colors and festive sprinkles. This isn’t just any dessert; it’s a centerpiece for your Easter celebrations, a guaranteed crowd-pleaser that brings smiles and creates cherished memories. What truly elevates our Easter Rice Krispie Treats is their incredible versatility and the sheer simplicity of their creation, allowing everyone from novice bakers to seasoned pros to achieve spectacular results. We’re going to transform the classic into something truly magical, infusing it with the whimsical spirit of Easter that makes these treats so incredibly special and utterly irresistible.
Ingredients:
- 16 ounces marshmallows (jumbo or mini both work well)
- 7 cups Rice Krispies cereal
- 2 tablespoons unsalted butter (for greasing)
- ½ cup unsalted butter (for the treat mixture)
- 3-4 cups powdered sugar
- ¼ cup milk
- 1 teaspoon vanilla extract
- Green food coloring (a few drops to achieve desired shade)
- Easter egg candies (mini chocolate eggs or jelly beans, for decoration)
Getting Started: Preparing Your Workspace
Gathering Your Tools
Before we dive into the fun, let’s make sure we have everything ready. You’ll need a large mixing bowl – the biggest one you have! A rubber spatula or a sturdy wooden spoon will be essential for stirring. You’ll also need a 9×13 inch baking pan. To prevent sticking, have your 2 tablespoons of unsalted butter ready to grease the pan thoroughly. A saucepan large enough to melt the marshmallows is key, and a separate bowl for mixing the frosting will be helpful. Don’t forget measuring cups and spoons! Having all your ingredients measured out beforehand, or “mise en place” as the chefs say, will make the process so much smoother and more enjoyable. This is especially important when working with sticky marshmallow mixtures.
Crafting the Easter Rice Krispie Treats Base
Melting the Marshmallows
Start by placing the ½ cup of unsalted butter into your large saucepan. Melt it over low to medium heat, stirring occasionally until it’s completely liquid and just begin extractning to foam slightly. Once the butter is melted, add all 16 ounces of marshmallows to the saucepan. Continue to stir constantly over low heat. The marshmallows will start to puff up and melt. It’s important to keep the heat low to prevent scorching the marshmallows, which can give your treats an unpleasant burnt flavor. Keep stirring until the mixture is smooth and all the marshmallows have completely dissolved into a gooey, sticky mass. This usually takes about 5-7 minutes.
Combining Cereal and Marshmallow Mixture
Once your marshmallow mixture is smooth and ready, remove the saucepan from the heat. Immediately add the 7 cups of Rice Krispies cereal to the melted marshmallow mixture. Working quickly, use your rubber spatula or wooden spoon to gently but thoroughly fold the cereal into the marshmallow. You want to coat every single piece of cereal with the sticky marshmallow goodness. Be careful not to overmix or press down too hard, as this can crush the cereal and result in dense, less airy treats. The goal is to have a light and fluffy mixture that’s still easy to work with.
Pressing into the Pan
Now it’s time to get these treats into their final form. Take your prepared 9×13 inch baking pan, which you’ve generously greased with the 2 tablespoons of unsalted butter. Spoon the Rice Krispies mixture into the greased pan. To prevent the sticky mixture from adhering to your hands, you can lightly butter your hands or use a piece of parchment paper. Gently press the mixture evenly into the pan. Again, avoid pressing too firmly, as this will compact the treats. You want them to be spread out and relatively even in thickness so they bake and set uniformly.
Creating the Sweet Green Frosting
Making the Frosting Base
In a separate medium bowl, combine the ¼ cup milk, 1 teaspoon vanilla extract, and 3 cups of the powdered sgin extractr. Begin whisking these ingredients together. At first, it might seem like there isn’t enough liquid, but keep whisking. The mixture will start to thicken. If it’s too thick to spread, you can add the remaining 1 cup of powdered sugar, a tablespoon at a time, until you reach a smooth, spreadable consistency. You’re aiming for a frosting that’s thick enough to coat the treats but not so stiff that it’s difficult to spread.
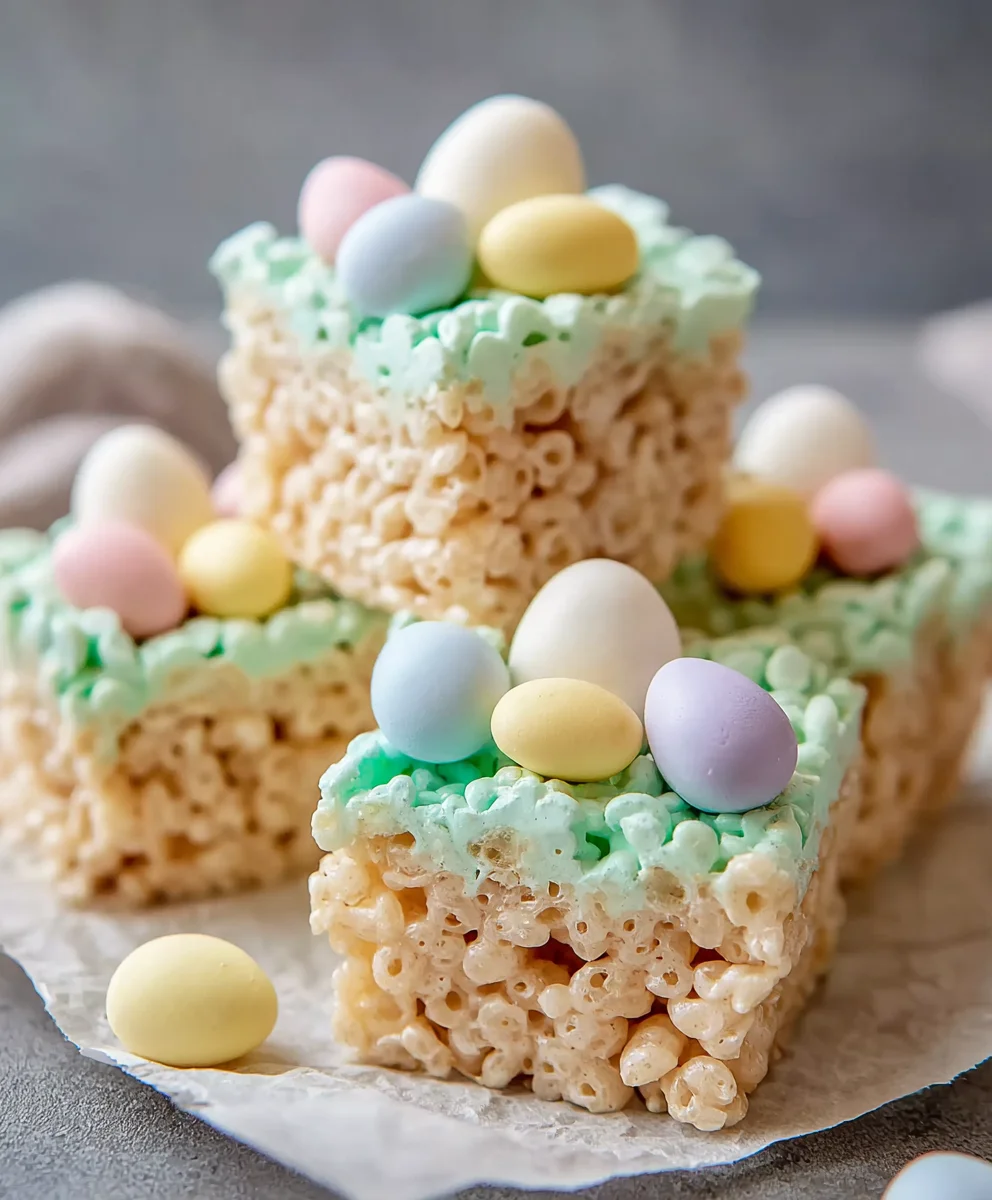
Adding Color and Applying Frosting
Once you have your basic frosting consistency, it’s time for the festive color! Add a few drops of green food coloring to the frosting. Start with a small amount and add more, stirring well after each addition, until you achieve your desired Easter green shade. You can always add more color, but you can’t take it away! Once your green frosting is ready, gently spread it evenly over the top of the pressed Rice Krispies mixture in the baking pan. Use your spatula or the back of a spoon to create a smooth, even layer.
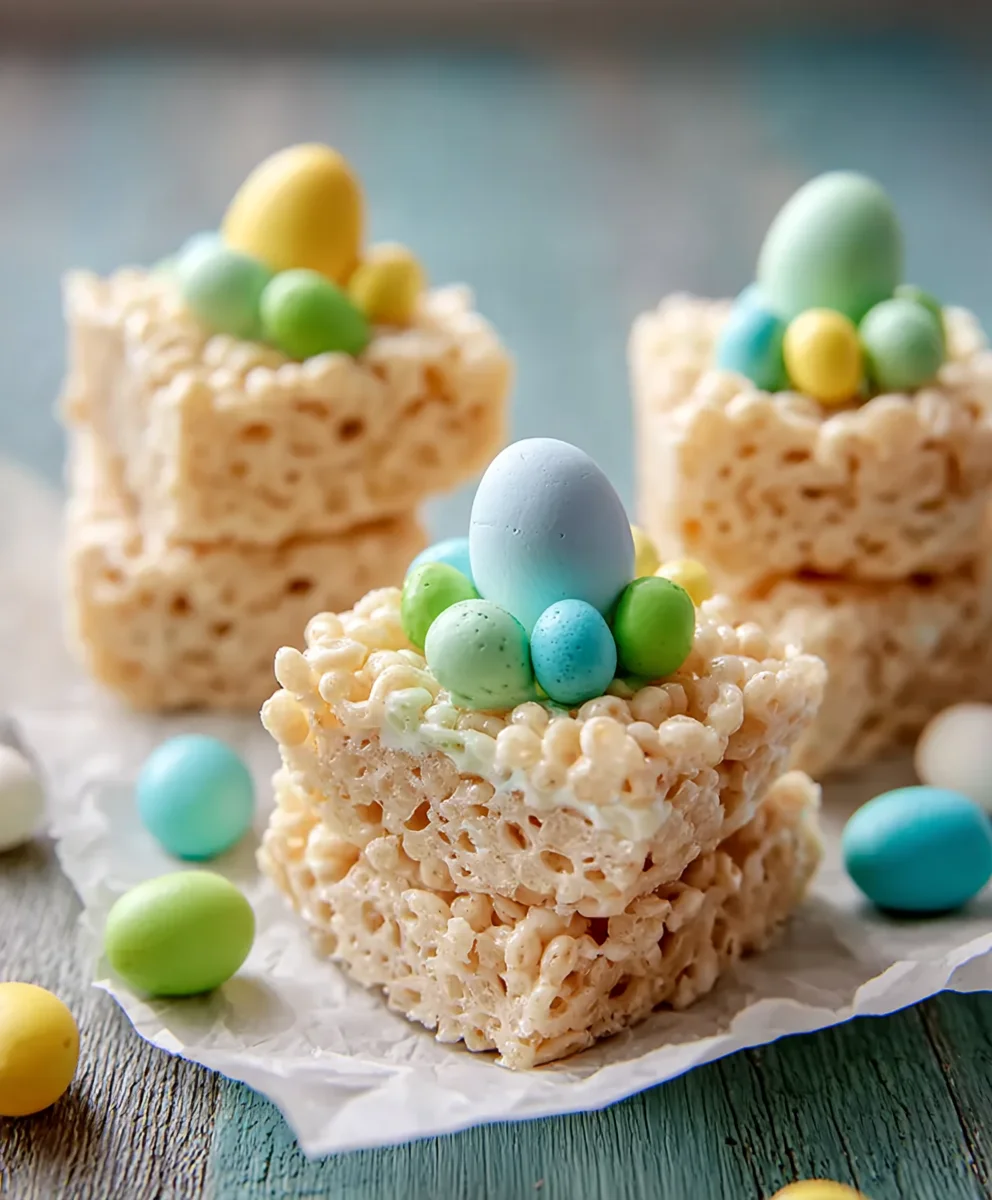
Decorating for Easter
Adding the Easter Candies
While the frosting is still wet, it’s time to add the final, delightful touches! Arrange your Easter egg candies (mini chocolate eggs or jelly beans) artfully over the green frosting. You can create patterns, sprinkle them randomly, or make festive designs. The wet frosting will act as a “glue” to hold the candies in place as they set. This is where you can really let your creativity shine and make these Easter Rice Krispie Treats truly special and visually appealing for any holiday gathering. Once decorated, allow the treats to sit at room temperature for at least 30 minutes to an hour to allow the frosting to set up properly before cutting.
Conclusion:
We hope you’ve enjoyed this delightful journey into creating the most festive and delicious Easter Rice Krispie Treats! This recipe is incredibly straightforward, making it a perfect activity for families to enjoy together during the springtime. The simple joy of transforming pantry staples into these cheerful, colorful treats is truly rewarding. You can customize these Easter Rice Krispie Treats with a variety of sprinkles, edible glitter, or even add a touch of food coloring to the melted marshmallows for a pastel hue. Serve them as a sweet ending to your Easter brunch, as part of a dessert table, or even as charming homemade gifts for friends and loved ones. Don’t be afraid to get creative and make these Easter Rice Krispie Treats your own! We encourage you to experiment with different shapes and decorations to truly capture the spirit of the holiday.
FAQs:
How do I make sure my Easter Rice Krispie Treats are soft and not too hard?
To ensure your Easter Rice Krispie Treats are soft and chewy, avoid pressing the mixture down too firmly into the pan. Gentle even pressure is key. Also, make sure not to overcook the marshmallows; melt them just until smooth and combined with the butter.
Can I make these Easter Rice Krispie Treats ahead of time?
Yes, absolutely! You can prepare Easter Rice Krispie Treats a day or two in advance. Store them in an airtight container at room temperature. For best results, ensure they are completely cooled before storing to prevent them from becoming soggy.
Easy Easter Rice Krispie Treats – Fun Spring Dessert
A delightful and easy-to-make Easter-themed dessert using Rice Krispie treats with a sweet green frosting and festive candy decorations.
Ingredients
-
16 ounces marshmallows (jumbo or mini both work well)
-
7 cups Rice Krispies cereal
-
2 tablespoons unsalted butter (for greasing)
-
½ cup unsalted butter (for the treat mixture)
-
3-4 cups powdered sugar
-
¼ cup milk
-
1 teaspoon vanilla extract
-
Green food coloring (a few drops to achieve desired shade)
-
Easter egg candies (mini chocolate eggs or jelly beans, for decoration)
Instructions
-
Step 1
Prepare your workspace by gathering all necessary tools and ingredients, including a large mixing bowl, rubber spatula or wooden spoon, 9×13 inch baking pan, saucepan, separate bowl for frosting, measuring cups and spoons, and butter for greasing. -
Step 2
Melt ½ cup unsalted butter in a large saucepan over low to medium heat. Add 16 ounces of marshmallows and stir constantly over low heat until completely melted and smooth, about 5-7 minutes. Avoid scorching. -
Step 3
Remove the saucepan from heat. Quickly add 7 cups of Rice Krispies cereal to the melted marshmallow mixture. Gently but thoroughly fold the cereal into the marshmallow using a spatula or spoon until every piece is coated. Do not overmix or press down. -
Step 4
Spoon the Rice Krispies mixture into the prepared 9×13 inch baking pan (greased with 2 tablespoons of butter). Lightly butter your hands or use parchment paper to prevent sticking. Gently press the mixture evenly into the pan without compacting it too much. -
Step 5
In a separate bowl, whisk ¼ cup milk, 1 teaspoon vanilla extract, and 3 cups of powdered sugar until thickened. Add remaining powdered sugar (up to 1 cup) tablespoon by tablespoon if needed for a smooth, spreadable consistency. -
Step 6
Add a few drops of green food coloring to the frosting and stir until the desired Easter green shade is achieved. Spread the green frosting evenly over the Rice Krispie treats in the pan. -
Step 7
While the frosting is still wet, artfully arrange Easter egg candies (mini chocolate eggs or jelly beans) over the frosting. Allow the treats to set at room temperature for at least 30 minutes to an hour before cutting.
Important Information
Nutrition Facts (Per Serving)
It is important to consider this information as approximate and not to use it as definitive health advice.
Allergy Information
Please check ingredients for potential allergens and consult a health professional if in doubt.