Easy Dango Recipe-Sweet Japanese Dumplings-Quick & Delicious
This Easy Dango Recipe is your gateway to delightful, chewy Japanese mochi balls that are surprisingly simple to make at home. Have you ever seen those beautiful skewers of colorful, bouncy dumplings at Japanese festivals or in anime and wondered how you could recreate that magic? Well, wonder no more! Dango are a beloved Japanese sweet, famous for their wonderfully soft and slightly chewy texture, which is incredibly satisfying to bite into. They’re often enjoyed with a sweet soy glaze (mitarashi dango) or served with red bean paste, but their subtle sweetness also makes them a fantastic canvas for any topping you fancy. What truly makes this Easy Dango Recipe special is how accessible it is. You don’t need fancy ingredients or complicated techniques. With just a few pantry staples, you’ll be crafting your own perfect dango in no time, bringin extractg a touch of Japanese culinary charm right into your kitchen.
Easy Dango Recipe
Dango, those delightful chewy rice dumplings often found on skewers, might seem a bit intimidating to make at home. But I’m here to tell you, it’s surprisingly simple and incredibly rewarding! Forget store-bought; this easy dango recipe will have you creating perfectly soft and chewy treats in no time. The magic lies in the simple ingredients and a straightforward process that even a begin extractner can master. We’ll be making classic plain dango and then infusing some with beautiful colors and flavors like matcha and a lovely pink. Get ready to impress yourself and anyone lucky enough to try these!
Ingredients:
Preparing the Dango Dough
The key to fluffy and chewy dango is the right ratio of non-glutinous to glutinous rice flour, and the perfect amount of water. Joshinko provides a slightly firmer texture, while Shiratamako gives that signature chewy, melt-in-your-mouth quality.
1. First, let’s get our main dango dough ready. In a large mixing bowl, combine the Joshinko and Shiratamako flours. If you’re using powdered sugar for a sweeter dango, add it now as well. Whisk everything together thoroughly to ensure the flours are evenly distributed. This prevents pockets of unmixed flour and ensures consistent texture in your dango.
2. Now, gradually add the hot water to the flour mixture. I recommend adding it about a quarter cup at a time, stirring with a spoon or chopsticks as you go. The heat from the water helps to activate the starches in the rice flour, making the dough pliable. Continue adding water until a shaggy dough forms. Don’t rush this step; you want to feel the dough coming together. It will be sticky and a little lumpy at this stage, and that’s perfectly normal.
3. Once the dough is mostly combined, it’s time to get your hands in there! Knead the dough in the bowl until it becomes smooth and elastic. This might take a few minutes. You’re looking for a consistency similar to playdough – not too sticky that it clings to your hands excessively, but not so dry that it crum extractbles. If it feels too dry, add a tiny bit more hot water, just a teaspoon at a time. If it’s too sticky, dust your hands with a little bit of Joshinko flour. Once it’s smooth, cover the bowl with plastic wrap or a damp kitchen towel and let it rest for about 10-15 minutes. This resting period allows the flours to fully hydrate, making the dough easier to handle.
Creating Colored Dango
This is where the fun really begin extracts! We’ll divide our dough and introduce some vibrant colors and flavors.
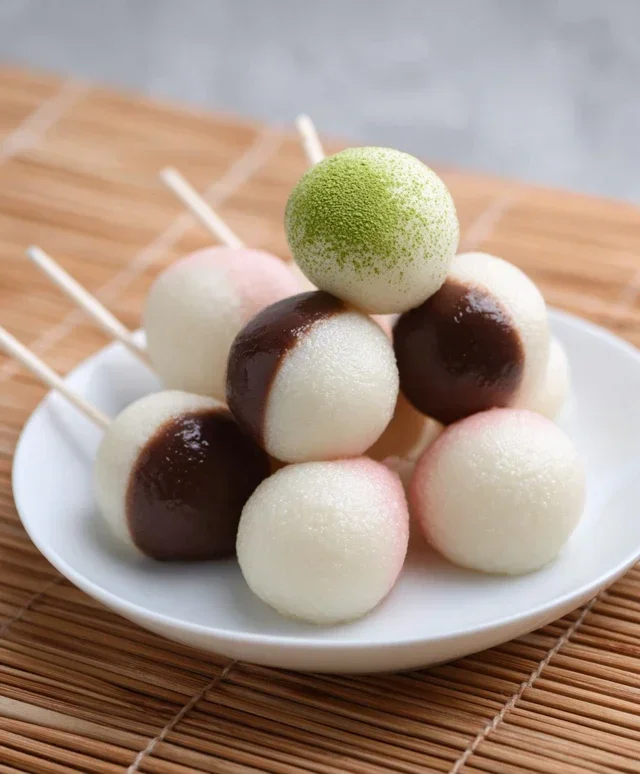
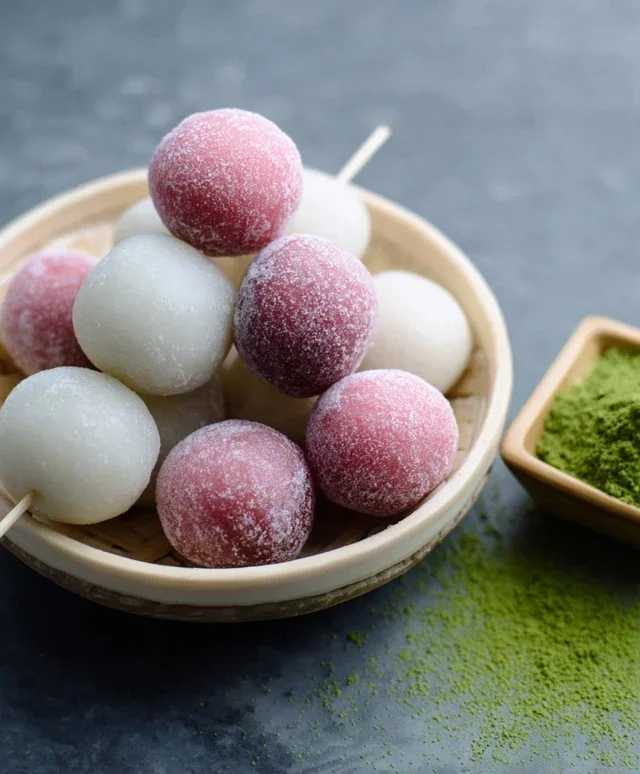
4. After the dough has rested, divide it into three roughly equal portions. Place one portion back into the clean bowl for your plain dango. In a separate small bowl, mix the matcha powder with 1 teaspoon of water to create a smooth paste. Add this matcha paste to the second portion of dango dough and knead until the color is evenly distributed and the dough is a lovely green. You can add a tiny splash of water if the dough becomes too dry from incorporating the matcha. For the third portion of dough, add just one drop of pink food coloring and knead until you achieve a beautiful, soft pink hue. Again, be mindful of adding too much liquid if the dough starts to feel sticky.
Shaping and Cooking Your Dango
Now for the satisfying part: shaping and cooking!
5. Take each portion of colored dough and roll it into a log about 1/2 inch (1.5 cm) in diameter. Then, pinch off small pieces from the log, about the size of a large marble or a small walnut. Roll each piece into a smooth ball between your palms. For a more traditional look, you can slightly flatten them. Don’t worry about perfection here; rustic is charming!
6. Bring a large pot of water to a rolling boil. Gently drop the dango balls into the boiling water, making sure not to overcrowd the pot. They will sink to the bottom initially. Stir them gently to prevent them from sticking to each other or the bottom of the pot. Cook the dango for about 5-8 minutes. You’ll know they’re ready when they float to the surface. Once they float, let them simmer for another minute or two to ensure they are cooked through.
7. Using a slotted spoon, carefully remove the cooked dango from the boiling water. Immediately transfer them to a bowl of ice-cold water. This shocking step is crucial! It stops the cooking process and gives the dango a wonderfully firm yet still chewy texture. Let them chill in the ice bath for a minute or two.
8. Finally, drain the dango well. You can serve them as is, or skewer them onto bamboo sticks (about 3-4 dango per stick for a classic presentation). Dango are best enjoyed fresh, but they can be stored in an airtight container at room temperature for a day or two. If they feel a bit firm the next day, you can briefly steam them to soften them up. Enjoy your homemade dango!
Conclusion:
And there you have it! This easy dango recipe is truly a delightful way to experience a traditional Japanese treat right in your own kitchen. Its simplicity makes it perfect for begin extractners, and the wonderfully chewy texture of the dango, especially when served warm, is incredibly satisfying. I love how versatile dango can be, making it a fantastic choice for a quick dessert, a tea-time snack, or even a fun activity to do with family and friends.
For serving, the classic choices are a sweet soy glaze (mitarashi dango) or a coating of kinako (roasted soybean flour). However, don’t be afraid to get creative! You could try a strawberry sauce, a dusting of matcha powder, or even a drizzle of melted chocolate for a more modern twist. The possibilities are endless, and the joy of making this easy dango recipe comes from personalizing it to your taste.
I wholeheartedly encourage you to give this recipe a try. It’s a wonderfully rewarding experience, and I’m confident you’ll be delighted with the results. Happy dango making!
Frequently Asked Questions:
What is the best way to store leftover dango?
For the best texture, dango is ideally enjoyed fresh. If you do have leftovers, store them in an airtight container at room temperature for up to a day. To reheat, gently steam them for a few minutes until they are soft and chewy again. Refrigerating can make them a bit hard, so room temperature storage is preferred.
Can I make dango ahead of time?
Yes, you can form the dango balls ahead of time and store them uncooked. Place them on a parchment-lined baking sheet, ensuring they don’t touch, and freeze until solid. Once frozen, transfer them to a freezer-safe bag. You can then cook them directly from frozen, just add a couple of extra minutes to the boiling time.
Easy Dango Recipe
A simple and delicious recipe for making soft and chewy dango at home, with optional colorful variations.
Ingredients
-
{‘@type’: ‘Ingredient’, ‘name’: ‘Joshinko non-glutinous rice flour’, ‘quantity’: ‘1 1/3 cup’, ‘additionalProperty’: ‘150 g’}
-
{‘@type’: ‘Ingredient’, ‘name’: ‘Shiratamako glutinous sweet rice flour’, ‘quantity’: ‘1 1/2 cup’, ‘additionalProperty’: ‘200 g’}
-
{‘@type’: ‘Ingredient’, ‘name’: ‘Powdered sugar’, ‘quantity’: ‘3/4 cup’, ‘description’: ‘Optional, to make it sweeter’, ‘additionalProperty’: ’75 g’}
-
{‘@type’: ‘Ingredient’, ‘name’: ‘Hot water’, ‘quantity’: ‘1 1/3 cup’}
-
{‘@type’: ‘Ingredient’, ‘name’: ‘Matcha powder’, ‘quantity’: ‘1 teaspoon’, ‘additionalProperty’: ‘1 tsp water’}
-
{‘@type’: ‘Ingredient’, ‘name’: ‘Pink food coloring’, ‘quantity’: ‘1 drop’}
Instructions
-
Step 1
In a large bowl, combine Joshinko and Shiratamako flours. If using, add powdered sugar and whisk to combine. -
Step 2
Gradually add hot water to the flour mixture, stirring with a spoon or spatula until a shaggy dough forms. Knead with your hands until smooth and well combined. -
Step 3
Divide the dough into portions. For colored dango, mix 1 tsp matcha with 1 tsp water and knead into one portion. For pink, add 1 drop of pink food coloring to another portion and knead until evenly colored. Leave the remaining dough plain. -
Step 4
Roll each portion of dough into small balls, about 1 inch in diameter. You should have plain, green, and pink dango. -
Step 5
Bring a pot of water to a rolling boil. Carefully drop the dango balls into the boiling water. They will sink initially. -
Step 6
Cook the dango until they float to the surface, then let them simmer for another 1-2 minutes. Remove the cooked dango with a slotted spoon and transfer them to a bowl of cold water to stop the cooking. -
Step 7
Drain the dango from the cold water. Serve immediately with your favorite sauce, such as anko (sweet red bean paste) or mitarashi (sweet soy glaze).
Important Information
Nutrition Facts (Per Serving)
It is important to consider this information as approximate and not to use it as definitive health advice.
Allergy Information
Please check ingredients for potential allergens and consult a health professional if in doubt.