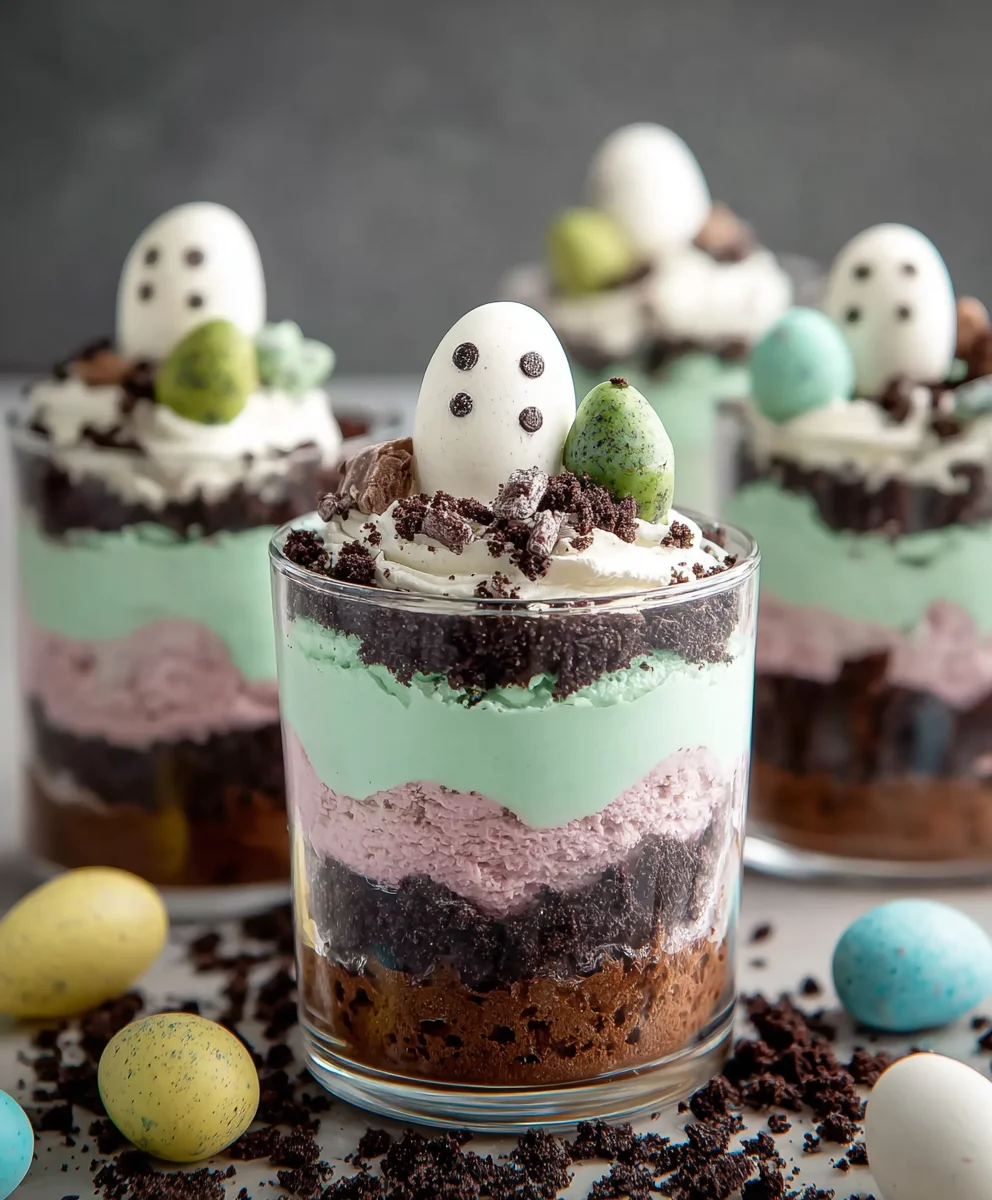
Easter Dirt Cups – Fun & Easy Treat
Easter Dirt Cups are more than just a sweet treat; they’re a delightful edible metaphor for the joy and wonder of springtime. Imagin extracte tiny, edible gardens blooming right in your dessert dish! That’s the magic of Easter Dirt Cups. What makes them so universally beloved? It’s their playful simplicity, the satisfying crunch of crushed cookies, the creamy sweetness of pudding, and the unexpected charm of gummy worms peeking out from their “dirt” homes. They evoke childhood nostalggin extract bringing back memories of Easter egg hunts and garden adventures. What truly sets these Easter Dirt Cups apart is their ability to transform ordinary ingredients into something whimsical and utterly irresistible. They’re incredibly versatile, allowing for creative interpretations with different pudding flavors and candy decorations, but the core concept remains pure, unadulterated fun for all ages. Get ready to dig into this delightful recipe!
Ingredients:
- 1 package (3.9 oz.) vanilla instant pudding mix
- 2 cups cold milk
- 1 container (8 oz.) Cool Whip, thawed
- Food coloring (suggested: purple and pink)
- 1 package Oreo cookies, finely crushed with filling removed
- Shredded coconut
- Candy eggs (like mini egg candies)
- Peeps marshmallow chicks or bunnies
- Food coloring for coconut
Preparing the “Dirt” Base
Step 1: Mix the Pudding
To start our delicious Easter Dirt Cups, we need to create the rich, chocolatey “dirt” that will form the base of our dessert. In a medium-sized bowl, pour the contents of the vanilla instant pudding mix. Gradually add the 2 cups of cold milk. Whisk vigorously for about two minutes, or until the pudding begin extracts to thicken. It’s crucial to use cold milk for the pudding to set properly. As you whisk, you’ll notice it transforming from a powdery mix into a smooth, creamy consistency. Once it’s thickened to your liking, set it aside to continue setting while we prepare the other components. This step is fairly quick, but don’t rush it, as a well-set pudding is key to the final texture of your dirt cups.
Step 2: Fold in the Cool Whip
Once the pudding has had a few minutes to firm up, it’s time to lighten it and add an extra layer of creamy sweetness. Gently fold in the thawed 8 oz. container of Cool Whip into the thickened pudding. Use a spatula and a folding motion, rather than vigorous stirring, to incorporate the Cool Whip without deflating it. This will create a fluffy, mousse-like texture that’s perfect for our Easter-themed dessert. Continue folding until no streaks of white Cool Whip remain and the mixture is uniformly blended. The goal is to maintain as much airiness as possible, as this contributes to a lighter, more enjoyable dirt cup.
Creating the Colorful “Easter Grass”
Step 3: Color the Coconut
Now, let’s add a festive Easter touch by coloring our shredded coconut to resemble vibrant Easter grass. Take a few small bowls or resealable bags. Divide your shredded coconut among these containers. Add a few drops of food coloring to each portion of coconut. We suggest using purple and pink for a classic Easter pnon-alcoholic alette, but feel free to get creative with other spring colors. If using bowls, use your fingers or a spoon to gently mix the food coloring into the coconut until it’s evenly distributed and vibrant. If using bags, close the bag securely and knead the coconut with your hands to ensure the color is applied thoroughly. You can add more drops of food coloring if you desire a more intense shade. Spread the colored coconut on a plate or baking sheet to dry slightly while you assemble the dirt cups. This step adds a wonderful visual appeal and a subtle hint of sweetness that complements the other flavors.
Assembling the Easter Dirt Cups
Step 4: Layering the “Dirt” and Cookies
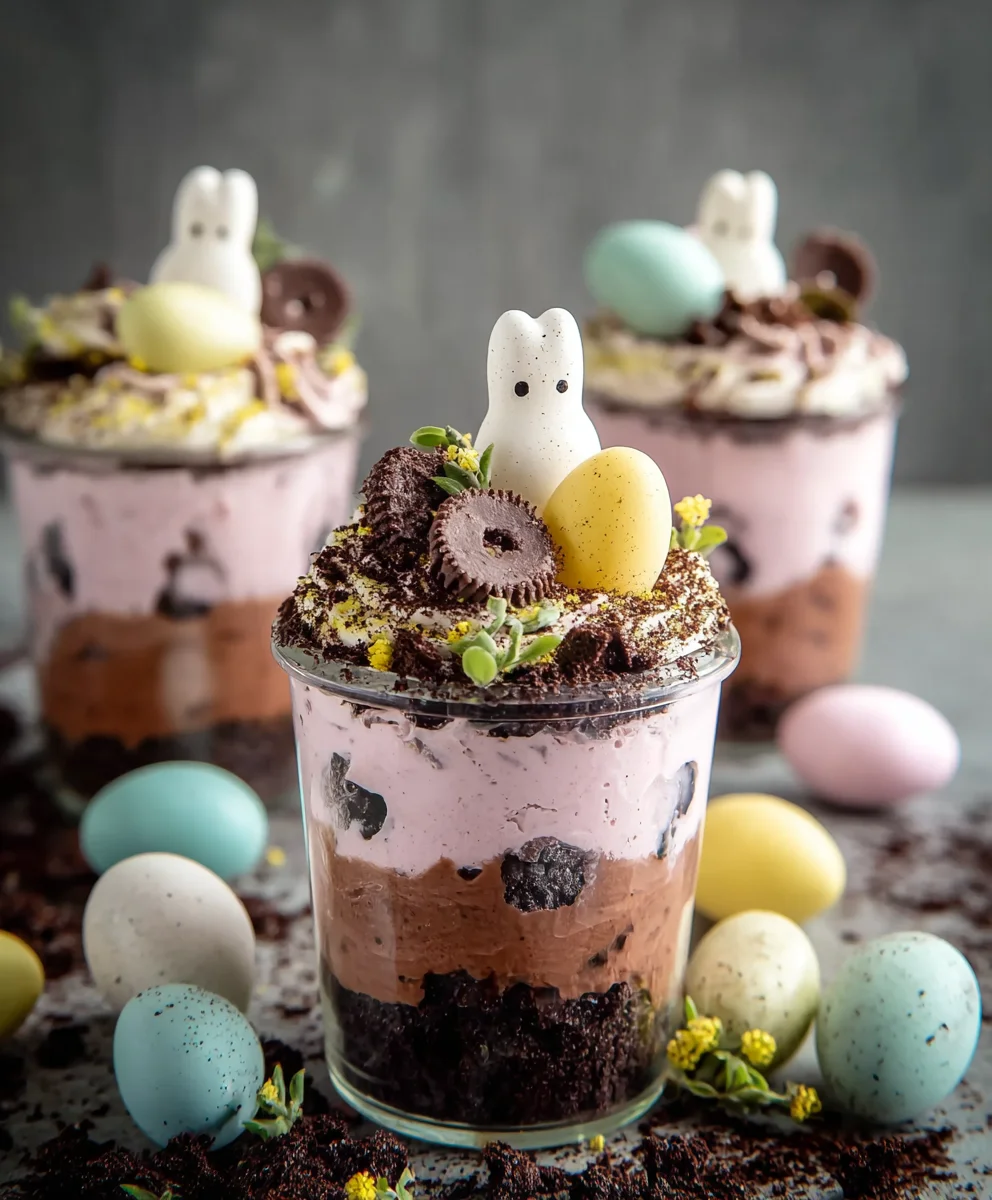
It’s time to assemble our Easter Dirt Cups! Grab your serving dishes – clear glasses, small jars, or even plastic cups work wonderfully to showcase the lagin extracts. Begin by spooning a layer of the prepared pudding and Cool Whip mixture into the bottom of each serving dish. Next, generously sprinkle a layer of the finely crushed Oreo cookies over the pudding. Make sure to remove the cream filling from the Oreos before crushing them; this ensures a better “dirt” texture. Don’t be shy with the cookie crum extractbs – this is the star of our “dirt” element! You can use a spoon to gently press down the cookie layer if you wish, but keeping it a bit loose also adds to the rustic charm.
Step 5: Adding the Easter Decorations
Now for the fun part – decorating our Easter Dirt Cups to look like a miniature Easter garden! After your layer of cookie “dirt,” add another layer of the pudding mixture. Then, sprinkle more crushed Oreos on top to create a fresh layer of dirt. Now it’s time to place your candy eggs and Peeps! Gently press a few candy eggs into the top layer of rum extractkie crumbs, making them look like they’ve been freshly laid in the garden. Arrange your Peeps marshmallow chicks or bunnies on top, as if they are hopping around in the grass. Finally, sprinkle the brightly colored shredded coconut around your Peeps and candy eggs to represent the Easter grass. The contrast of the dark cookie “dirt,” the creamy pudding, the colorful coconut “grass,” and the cheerful candy decorations makes these Easter Dirt Cups a truly delightful and festive treat. Enjoy them chilled!
Conclusion:
And there you have it – your very own batch of delicious and fun Easter Dirt Cups! We hope you enjoyed this simple yet incredibly satisfying recipe. These Easter Dirt Cups are more than just a dessert; they’re a delightful activity that brings smiles to faces of all ages. They are perfect for classroom parties, family gatherings, or simply as a sweet treat to celebrate the spirit of Easter. Remember, the beauty of this recipe lies in its adaptability. Feel free to get creative with your decorations and chocolate pudding flavors!
We encourage you to share your creations and enjoy the process as much as the delicious outcome. Happy Easter, and happy baking!
Frequently Asked Questions about Easter Dirt Cups:
Can I make these ahead of time?
Absolutely! Easter Dirt Cups can be assembled a day in advance. Store them covered in the refrigerator to keep them fresh. However, for the best texture, it’s recommended to add the candy worms and any other delicate decorations just before serving to prevent them from becoming soggy.
Are there any nut-free variations for Easter Dirt Cups?
Yes! To make these nut-free, ensure your chocolate pudding mix and cookies are certified nut-free. Many brands offer nut-free options. You can substitute the chocolate cookies with gluten-free cookies or even crushed grabeef ham crackers if needed, ensuring they are prepared in a nut-free facility.
What other toppings can I use besides candy worms?
The possibilities are endless! You can use gummy bunnies, chocolate eggs, pastel-colored sprinkles, mini marshmallows, or even little edible flowers. Get creative and make your Easter Dirt Cups uniquely yours!
Easter Dirt Cups – Fun & Easy Treat
A fun and easy Easter treat featuring layers of chocolate cookie “dirt”, creamy pudding, and colorful coconut “grass”, decorated with candy eggs and Peeps.
Ingredients
-
1 package (3.9 oz.) vanilla instant pudding mix
-
2 cups cold milk
-
1 container (8 oz.) Cool Whip, thawed
-
Food coloring (suggested: purple and pink)
-
1 package Oreo cookies, finely crushed with filling removed
-
Shredded coconut
-
Candy eggs (like mini egg candies)
-
Peeps marshmallow chicks or bunnies
-
Food coloring for coconut
Instructions
-
Step 1
In a medium-sized bowl, pour the vanilla instant pudding mix and gradually add the 2 cups of cold milk. Whisk vigorously for about two minutes until the pudding begins to thicken. Set aside to continue setting. -
Step 2
Gently fold the thawed Cool Whip into the thickened pudding using a spatula until uniformly blended, creating a fluffy, mousse-like texture. -
Step 3
Divide shredded coconut into small bowls or bags. Add a few drops of food coloring (e.g., purple and pink) to each portion and mix until evenly distributed. Spread colored coconut on a plate to dry slightly. -
Step 4
Spoon a layer of the pudding mixture into the bottom of serving dishes. Generously sprinkle a layer of finely crushed Oreo cookies over the pudding. -
Step 5
Add another layer of the pudding mixture, followed by more crushed Oreos on top. Gently press candy eggs into the cookie crumbs and arrange Peeps marshmallow chicks or bunnies on top. Sprinkle the colored coconut around the decorations to resemble Easter grass. Enjoy chilled.
Important Information
Nutrition Facts (Per Serving)
It is important to consider this information as approximate and not to use it as definitive health advice.
Allergy Information
Please check ingredients for potential allergens and consult a health professional if in doubt.