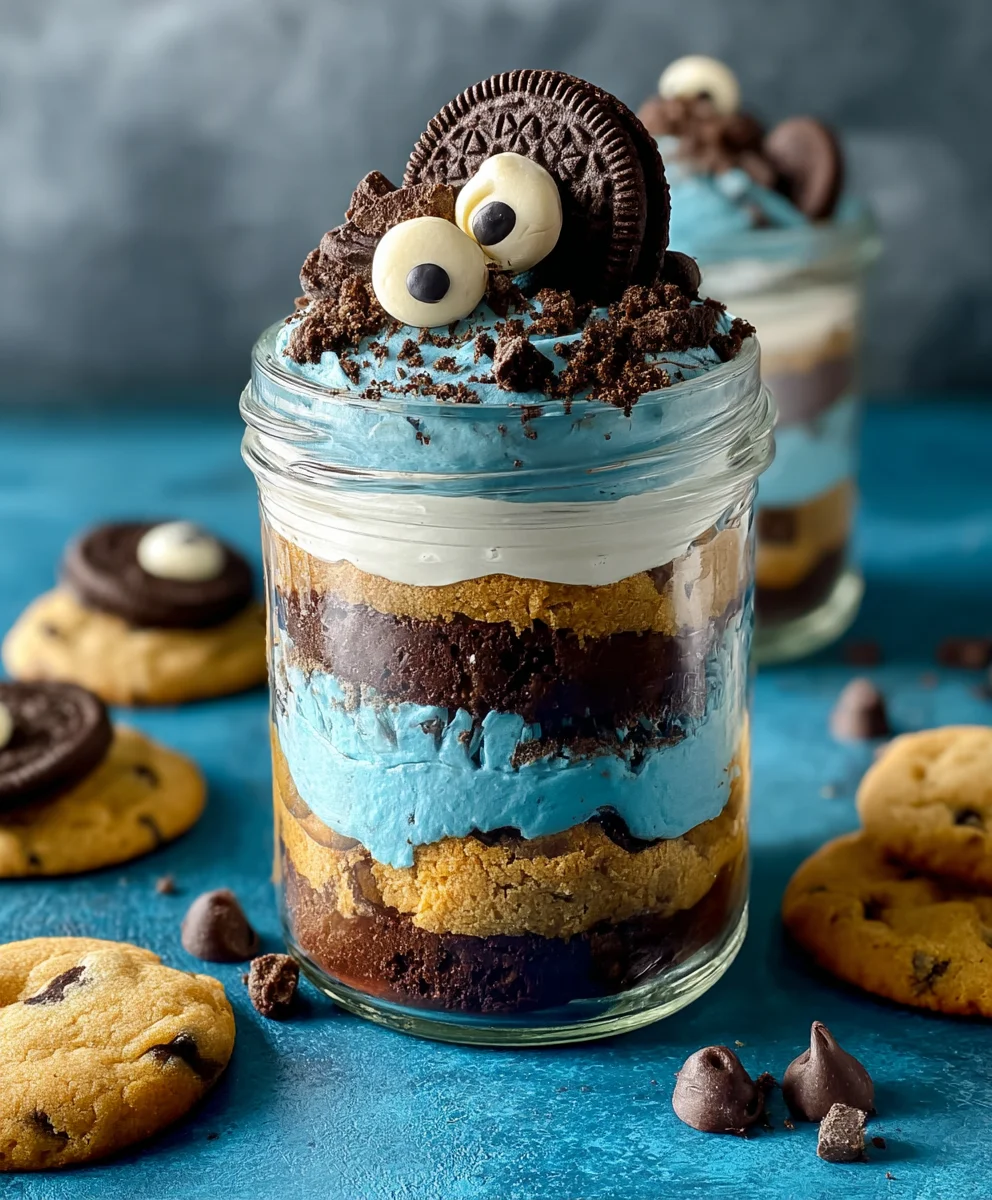
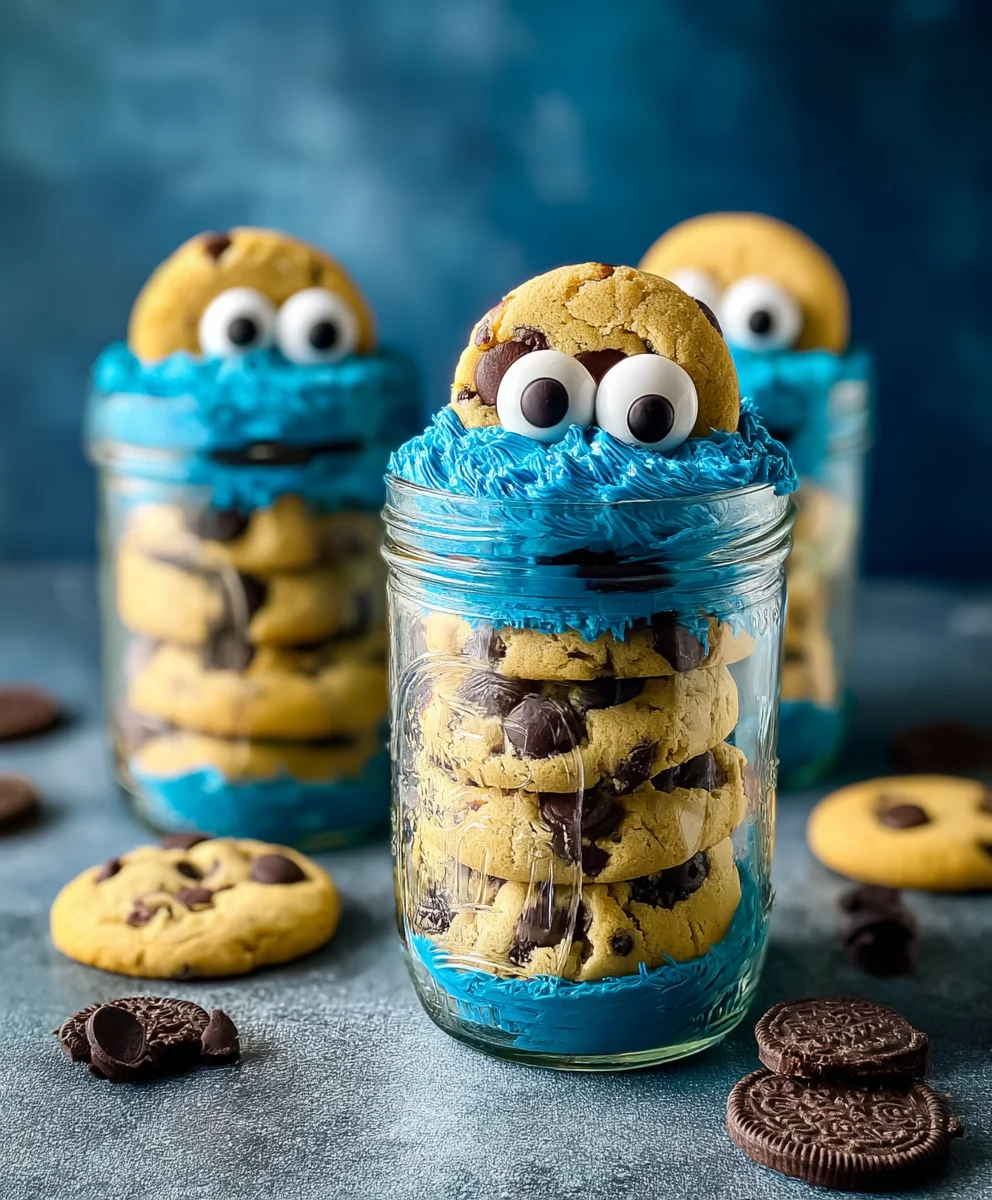
Cookie Monster Cake Jars-Fun Treat Recipe
Cookie Monster Cake Jars are more than just a dessert; they’re a delightful explosion of blue hues and sweet, crum extractbly goodness that will transport you straight to Sesame Street. Who can resist the charm of this iconic character, and more importantly, who can resist a perfectly portioned, layered treat that captures his playful spirit? These portable delights have captured hearts because they deliver that satisfying cake and cookie combination in a fun, convenient package. What truly makes Cookie Monster Cake Jars special is their vibrant visual appeal, combined with a surprisingly sophisticated layering of textures and flavors. We’re talking moist cake, creamy frosting, and of course, plenty of crunchy cookie pieces, all artfully assembled to create a miniature masterpiece in every jar. Get ready to dive into a batch of these fun, edible treasures!
Why You’ll Love These Cookie Monster Cake Jars
These aren’t your average dessert. The sheer joy of seeing that signature blue, studded with chocolate chip rum extractkie crumbles, is enough to brighten any day. They’re perfect for parties, a special treat for the kids, or even a personal indulgence when you need a little pick-me-up. The individual portioning also makes them fantastic for on-the-go enjoyment or as delightful party favors that guests will rave about long after the celebration ends.
What Makes Them So Irresistible
The magic lies in the careful balance of components. We start with a fluffy, slightly tangy vanilla cake, infused with that classic blue coloring that’s synonymous with our favorite monster. Then comes a luscious, creamy vanilla buttercream, whipped to perfection for that melt-in-your-mouth sensation. But the star of the show, arguably, is the generous inclusion of crushed chocolate chip cookies, adding a delightful textural contrast and that irresistible, nostalgic cookie flavor. It’s a symphony of sweet, creamy, and crunchy that’s simply unforgettable.
Ingredients:
- 15 oz box white or vanilla cake mix
- Ingredients called for on cake mix box (typically eggs, oil, and water)
- 10 Oreos, chopped (divided)
- ½ cup (1 stick) unsalted butter, room temperature
- ½ cup vegetable shortening
- 3 cups powdered sugar
- 2-3 tablespoons milk or coffee creamer
- 1 teaspoon vanilla extract
- 1 drop electric blue Americolor gel color
- 2 drops royal blue Chef Masters gel color
- 8-10 Oreos, chopped
- 8-10 chocolate chip cookies, chopped
- 8 candy eyes
- 2 chocolate chip cookies, cut in half
- Blue ribbon (optional, for decorating jars)
Baking the Cake
Step 1: Prepare the Cake Batter
Let’s start by getting our cake ready for the Cookie Monster Cake Jars. Pre-heat your oven according to the directions on your white or vanilla cake mix box. Grease and flour two 8-inch round cake pans, or line them with parchment paper for easy removal. In a large mixing bowl, combine the cake mix with the wet ingredients as specified on the box – usually this involves eggs, vegetable oil, and water. Mix everything together until just combined and smooth, being careful not to overmix, as this can lead to a tough cake.
Step 2: Bake and Cool the Cake Layers
Once your batter is ready, divide it evenly between the prepared cake pans. Gently tap the pans on the counter a couple of times to release any large air bubbles. Bake the cakes in the preheated oven for the time indicated on the box, or until a toothpick inserted into the center comes out clean. Allow the cakes to cool in the pans for about 10-15 minutes before carefully inverting them onto a wire rack to cool completely. It’s crucial that the cakes are entirely cool before moving on to the next step, otherwise, your frosting will melt!
Making the Cookie Monster Frosting
Step 3: Cream the Butter and Shortening
Now for the star of our Cookie Monster Cake Jars – the vibrant blue frosting! In a large mixing bowl, using an electric mixer, cream together the room temperature unsalted butter and the vegetable shortening. Beat them on medium-high speed until they are light and fluffy, which usually takes about 3-5 minutes. This step is important for creating a smooth and stable frosting base that won’t be greasy. Make sure your butter is truly at room temperature – soft but not melted.
Step 4: Incorporate Powdered Sugar and Flavorings
Gradually add the powdered sugar to the creamed butter and shortening mixture, one cup at a time, mixing on low speed until each addition is incorporated. Once all the powdered sugar is added, increase the speed to medium-high and beat for another 2-3 minutes until the frosting is smooth and creamy. Now, add the vanilla extract and 2 tablespoons of milk or coffee creamer. Mix again until well combined. At this point, you’ll add your gel food colors. Start with 1 drop of electric blue Americolor gel and 2 drops of royal blue Chef Masters gel. Mix thoroughly. If you desire a deeper, more intense Cookie Monster blue, you can add another drop of each color, mixing until you achieve your perfect shade. Be mindful that gel colors are very concentrated, so a little goes a long way! If the frosting seems too thick, you can add the remaining tablespoon of milk or coffee creamer, one teaspoon at a time, until you reach your desired consistency for spreading.
Assembling the Cookie Monster Cake Jars
Step 5: Crum extractb Coat and Frost the Cake Layers
Once your cake layers are completely cool, place one layer on your serving surface or cake stand. Spread a thin layer of your vibrant blue frosting over the top of this cake layer. Sprinkle about half of the 10 chopped Oreos over this frosting. This creates a delirum extractus “crumb coat” layer. Then, place the second cake layer on top. Generously frost the entire outside of the cake with the remaining blue frosting, ensuring a smooth and even coating. Don’t worry if it’s not perfectly smooth; a slightly rustic look can be charming!
Step 6: Decorate and Assemble the Jars
Now for the fun part – assembling the Cookie Monster Cake Jars! You’ll need clean, empty jars for this. Start by breaking up some of the baked cake into bite-sized pieces. Place a layerrum extract these cake crumbles at the bottom of each jar. Next, add a layer of your prepared blue frosting. Then, generously sprinkle a mixture of the remaining chopped Oreos and chopped chocolate chip cookies over the frosting. Reperum extractthese layers – cake crumbles, blue frosting, and cookie mixture – until the jars are about ¾ full.
Step 7: Add the Finishing Touches
For the final layer in your Cookie Monster Cake Jars, top with a final dollop of blue frosting. Now, it’s time to bring our Cookie Monster to life! Gently press two candy eyes into the top frosting layer of each jar to create a classic Cookie Monster face. Take the two chocolate chip cookies that you cut in half and place them on either side of the candy eyes, as if they are peeking out from under eyebrows. If you’re using the blue ribbon, tie a decorative bow around the neck of each jar for an extra touch of flair. These Cookie Monster Cake Jars are now ready to be chilled and enjoyed! You can store them in the refrigerator for up to 3 days.
Conclusion:
And there you have it! Your very own batch of delightful Cookie Monster Cake Jars, ready to bring smiles and sweet satisfaction. We’ve walked through each simple step to create these adorable and delicious treats, perfect for any occasion or just a spontaneous craving. The vibrant blue cake layered with crum extractbled cookies and creamy frosting is a visual and taste sensation that’s sure to impress.
These Cookie Monster Cake Jars are incredibly versatile. Serve them chilled straight from the fridge for a delightful dessert, or pack them up for a fun picnic or party favor. For a touch of extra indulgence, consider a dollop of whipped cream or a dusting of edible glitter on top. Don’t be afraid to get creative with variations! You could swap the blue food coloring for other fun colors, experiment with different rum extractkie crumbles like chocolate chip or shortbread, or even add a layer of cookie dough frosting for an even more decadent experience.
We truly hope you enjoy making and devouring these Cookie Monster Cake Jars as much as we do. Don’t hesitate to share your creations and variations with friends and family. Happy baking!
Frequently Asked Questions:
Can I make the cake and frosting ahead of time?
Absolutely! The cake layers can be baked and cooled a day or two in advance, and the frosting can also be made and stored in an airtight container in the refrigerator. Just bring the frosting to room temperature and give it a good stir before assembling your Cookie Monster Cake Jars.
How long do Cookie Monster Cake Jars last?
When stored properly in airtight jars in the refrigerator, your Cookie Monster Cake Jars should stay fresh and delicious for up to 3-4 days. The cookies might soften slightly over time, but they still taste wonderful!
Can I use store-bought cake mix for these jars?
Yes, you certainly can! Using a good quality vanilla or white cake mix is a perfectly acceptable shortcut for the cake layers, especially if you’re short on time. Just follow the package instructions and proceed with coloring and assembling as directed in the recipe.
Cookie Monster Cake Jars
Fun and colorful cake jars inspired by the beloved Cookie Monster, featuring layers of cake, blue frosting, and crushed cookies.
Ingredients
-
15 oz box white or vanilla cake mix
-
Ingredients called for on cake mix box (typically eggs, oil, and water)
-
18-20 Oreos, chopped (divided)
-
½ cup (1 stick) unsalted butter, room temperature
-
½ cup vegetable shortening
-
3 cups powdered sugar
-
2-3 tablespoons milk or coffee creamer
-
1 teaspoon vanilla extract
-
1 drop electric blue Americolor gel color
-
2 drops royal blue Chef Masters gel color
-
8-10 chocolate chip cookies, chopped
-
8 candy eyes
-
2 chocolate chip cookies, cut in half
-
Blue ribbon (optional, for decorating jars)
Instructions
-
Step 1
Preheat oven according to cake mix box. Grease and flour two 8-inch round cake pans. Combine cake mix with wet ingredients as specified on the box. Mix until just combined and smooth. -
Step 2
Divide batter evenly between prepared pans. Bake according to box directions, or until a toothpick inserted into the center comes out clean. Cool in pans for 10-15 minutes, then invert onto a wire rack to cool completely. -
Step 3
In a large bowl, cream together room temperature butter and shortening with an electric mixer until light and fluffy (3-5 minutes). Gradually add powdered sugar, mixing on low speed until incorporated, then beat on medium-high for 2-3 minutes until smooth and creamy. Add vanilla extract and 2 tablespoons of milk or coffee creamer. Mix well. -
Step 4
Add electric blue and royal blue gel colors, mixing thoroughly until desired Cookie Monster blue is achieved. Add more color if needed. If frosting is too thick, add remaining milk or coffee creamer, one teaspoon at a time, until desired consistency is reached. -
Step 5
Break up cooled cake into bite-sized pieces. Layer cake crumbles at the bottom of clean jars. Add a layer of blue frosting, then a generous sprinkle of chopped Oreos and chocolate chip cookies. Repeat layers until jars are about ¾ full. -
Step 6
Top each jar with a final dollop of blue frosting. Gently press two candy eyes into the frosting to create a face. Place halved chocolate chip cookies on either side of the eyes. Tie a blue ribbon around jars if desired. Chill before serving. Store in the refrigerator for up to 3 days.
Important Information
Nutrition Facts (Per Serving)
It is important to consider this information as approximate and not to use it as definitive health advice.
Allergy Information
Please check ingredients for potential allergens and consult a health professional if in doubt.