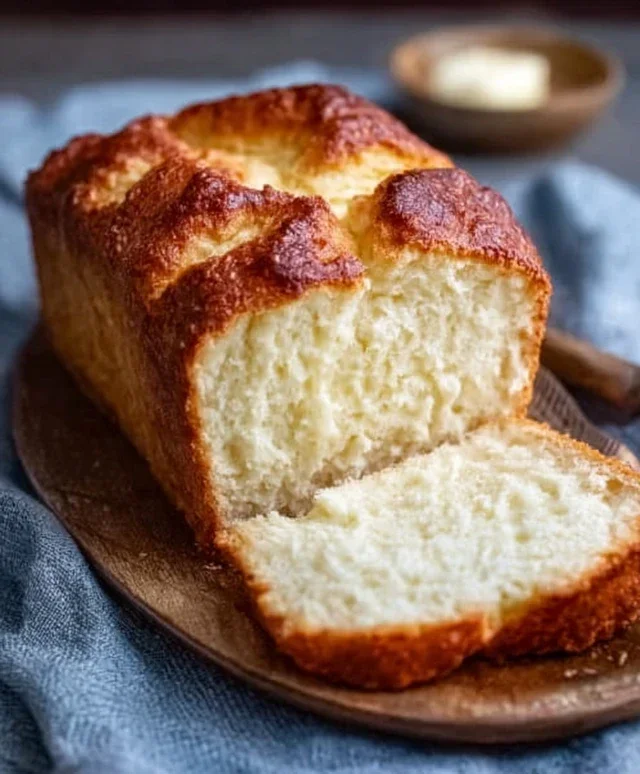
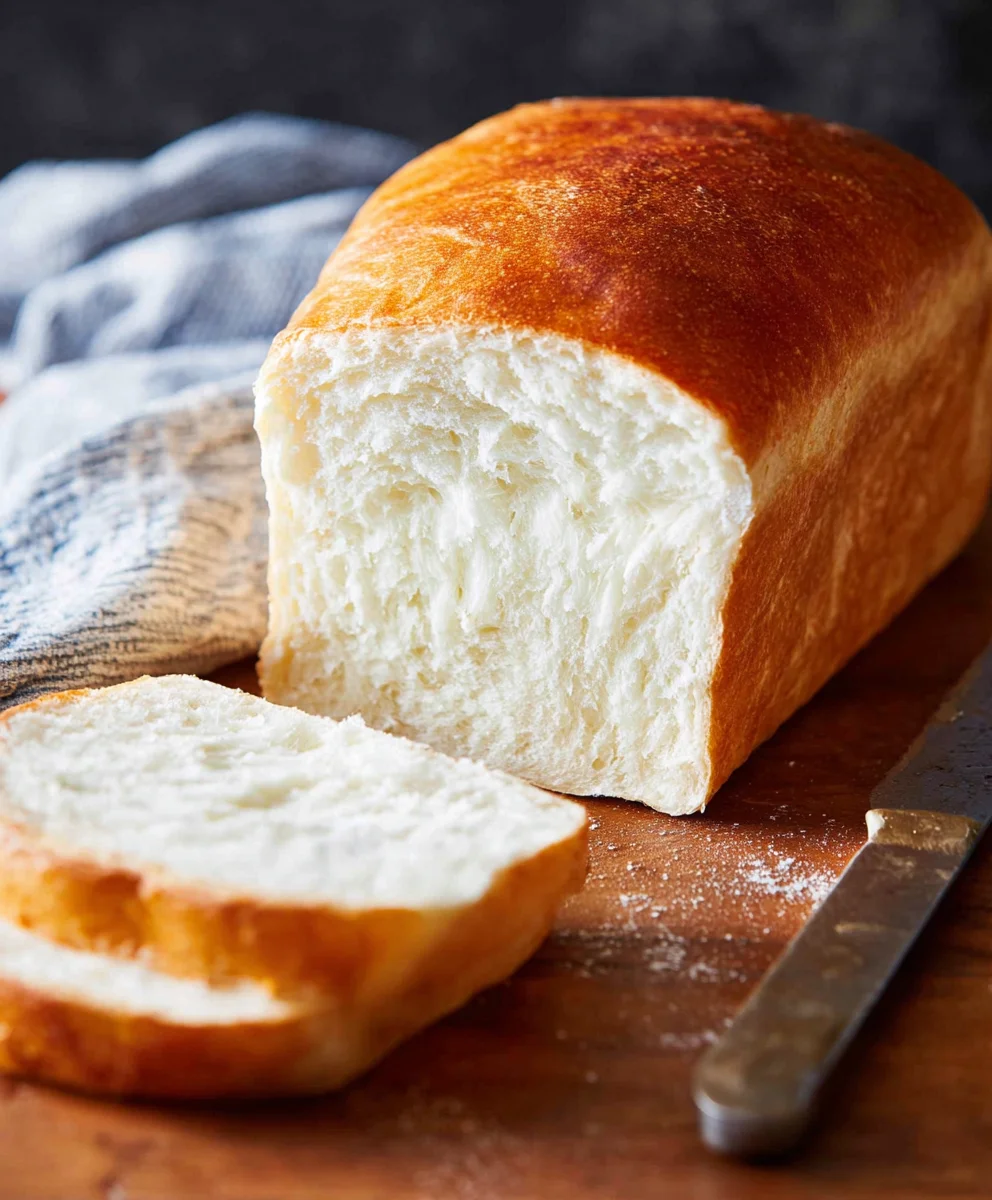
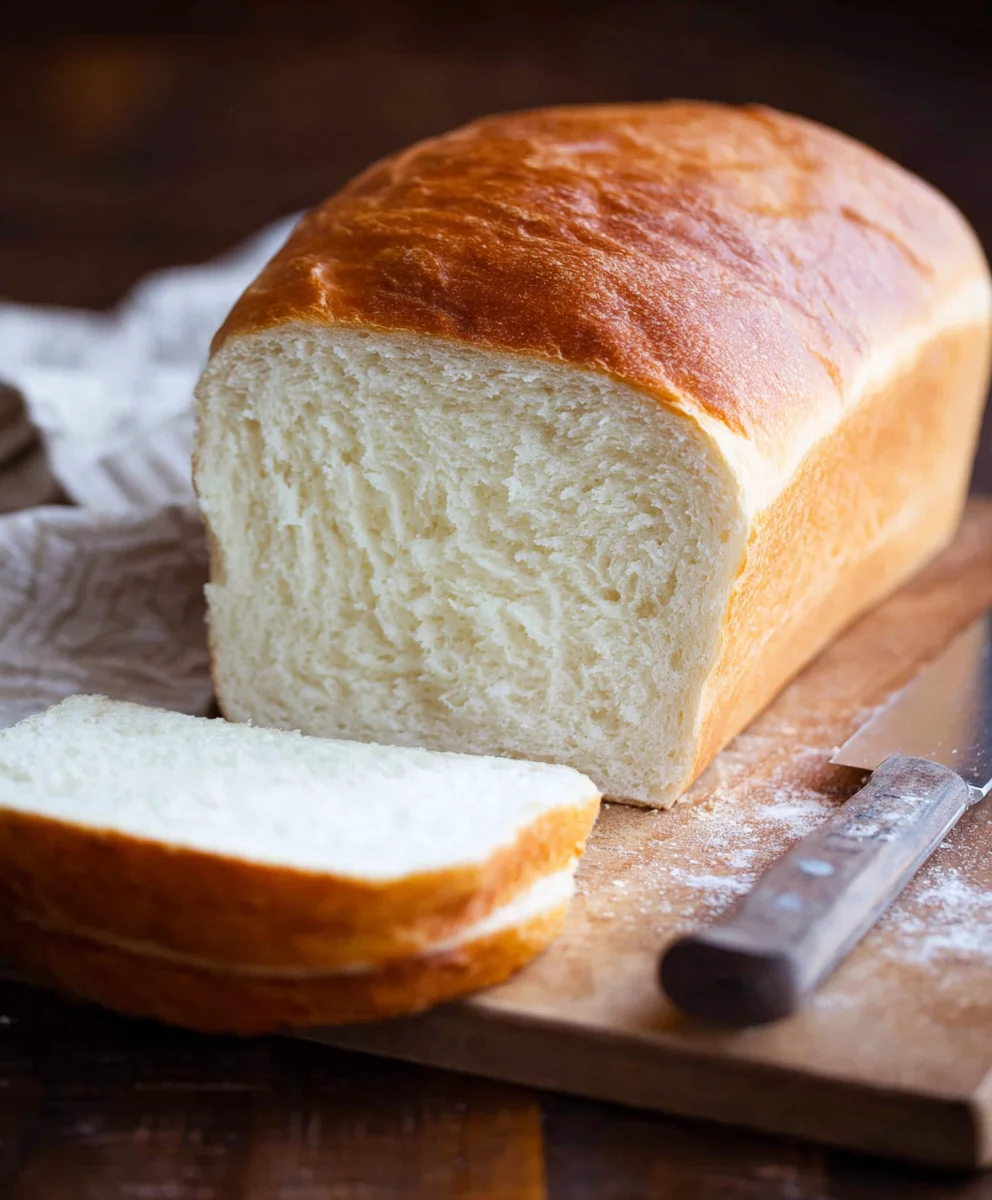
Classic Amish White Bread Recipe – Easy & Delicious
AMISH WHITE BREAD isn’t just a recipe; it’s a warm hug from a simpler time, a comforting aroma that instantly transports you to the heart of a cozy kitchen. There’s a reason why this classic loaf holds such a special place in so many hearts. It’s the epitome of pure, unadulterated deliciousness – soft, pillowy, and with a subtle sweetness that makes it utterly irresistible. Whether you’re slathering it with butter, dipping it into soup, or building the most magnificent sandwich imagin extractable, this bread delivers a taste experience that’s both nostalgic and profoundly satisfying. What truly sets this AMISH WHITE BREAD apart is its incredible simplicity and the quality of its ingredients, allowing the pure flavor of wheat and yeast to shine through. Get ready to bake a batch that will fill your home with an unforgettable scent and your table with pure joy.
Ingredients:
- 1 cup warm water, (110-120°F)
- ⅓ cup granulated sugar
- 1 packet, (2 ¼ teaspoons instant yeast)
- 3 cups all-purpose flour, plus more for dusting
- ¾ teaspoon salt
- 2 tablespoons vegetable or canola oil
- 2 tablespoons unsalted butter, melted
Preparing the Dough
The journey to a perfect loaf of AMISH WHITE BREAD begin extracts with activating the yeast. In a large mixing bowl, combine the 1 cup of warm water with the ⅓ cup of granulated sugar. Give it a gentle stir to help dissolve the sugar. Now, sprinkle the entire packet of instant yeast over the surface of the water. You don’t need to stir it in immediately; the yeast will start to bloom on its own. Let this mixture sit undisturbed for about 5 to 10 minutes. You’ll know the yeast is active and ready when it becomes foamy and bubbly on the surface. This visual cue is your assurance that your bread will rise beautifully. If you don’t see any activity after 10 minutes, your yeast might be expired, and it’s best to start with a fresh packet.
Once the yeast is activated, it’s time to add the other foundational ingredients for our dough. To the foamy yeast mixture, add the 3 cups of all-purpose flour and the ¾ teaspoon of salt. For incorporating the wet and dry ingredients, you have a couple of options depending on your preference and equipment. If you’re using a stand mixer, attach the dough hoogin extractnd begin mixing on low speed. If you’re mixing by hand, use a sturdy spoon or spatula initially. Mix until the ingredients just start to come together into a shaggy dough. At this stage, it’s still quite sticky and unformed.
Kneading the Dough
Now, we move on to developing the gluten, which gives our AMISH WHITE BREAD its characteristic soft and chewy texture. If you’re using a stand mixer, increase the speed slightly to medium-low and continue to knead for about 5 to 7 minutes. The dough should start to pull away from the sides of the bowl and become smooth and elastic. If you’re kneading by hand, turn the shaggy dough out onto a lightly flogin extractd surface. Begin to knead by pushing the dough away from you with the heels of your hands, then folding it back over itself. Rotate the dough a quarter turn and repeat. This process can take about 8 to 10 minutes. You’ll know the dough is properly kneaded when it’s smooth, elastic, and springs back slowly when you poke it with a finger.
After kneading, the dough will need its first rise. Lightly grease a clean, large bowl with a little of the vegetable or canola oil – just enough to coat the bottom and sides. Place the kneaded dough into the greased bowl, turning it once to coat all sides with the oil. This prevents the dough from drying out as it rises. Cover the bowl tightly with plastic wrap or a clean kitchen towel. Find a warm, draft-free spot in your kitchen for the dough to rise. An oven that has been turned off after being preheated slightly (then cooled) or a sunny windowsill can work well. Allow the dough to rise for 1 to 1 ½ hours, or until it has doubled in size. It should feel light and airy when gently poked.
Shaping and Second Rise
Once your dough has impressively doubled in size, it’s time to punch it down. Gently press down on the risen dough to release the trapped air. Turn the dough out onto a lightly floured surface once more. At this point, you can knead it gently for about 30 seconds to a minute to redistribute the air pockets. Now, we’ll shape the dough for baking. For a traditional loaf, gently flatten the dough into a rough rectangle. Then, tightly roll up the rectangle from one of the longer sides, pressing gently as you roll to create a taut surface. Pinch the seam closed at the bottom and tuck in the ends.
Prepare your baking vessel. For a standard loaf pan, grease a 9×5-inch loaf pan generously with butter or cooking spray, or line it with parchment paper. Place the shaped dough seam-side down into the prepared loaf pan. Cover the loaf pan loosely with plastic wrap or a clean kitchen towel. Allow the dough to rise for a second time in a warm place for about 45 minutes to 1 hour, or until it has risen about 1 inch above the rim of the pan. This second rise is crucial for achieving that beautiful dome on your AMISH WHITE BREAD. While the dough is undergoing its second rise, preheat your oven to 375°F (190°C).
Baking the AMISH WHITE BREAD
Just before baking, we’ll give the loaf a final touch for a beautiful golden crust. In a small bowl, whisk together the 2 tablespoons of melted unsalted butter with the 2 tablespoons of vegetable or canola oil. Gently brush this mixture over the top of the risen dough. This not only adds a lovely sheen but also contributes to a soft, tender crust. Carefully place the loaf pan into the preheated oven. Bake for 30 to 40 minutes, or until the crust is a deep golden brown and the internal temperature of the bread reaches 190-200°F (88-93°C) when measured with an instant-read thermometer. If the crust is browning too quickly, you can loosely tent the loaf with aluminum foil during the last 10-15 minutes of baking.
Once baked to perfection, carefully remove the loaf from the oven. Immediately invert the loaf onto a wire cooling rack. If you used parchment paper, you can lift it out easily. Allowing the bread to cool completely on a wire rack is essential. This step allows the steam to escape and the internal structure of the bread to set, preventing a gummy texture. Resist the temptation to slice into it while it’s piping hot. Patience here will be rewarded with the best flavor and texture. Once cooled, your homemade AMISH WHITE BREAD is ready to be sliced and enjoyed, whether slathered with butter, used for sandwiches, or dipped into your favorite soup.
Conclusion:
We’ve reached the end of our journey creating the perfect AMISH WHITE BREAD! This recipe is a testament to simple ingredients yielding extraordinary results. The aroma that fills your kitchen as this bread bakes is truly heartwarming, and the taste is pure comfort. Whether you’re a seasoned baker or just starting out, I encourage you to give this AMISH WHITE BREAD a try. Its straightforward process makes it accessible for everyone, and the satisfaction of pulling a golden-brown loaf from your oven is unparalleled. Don’t be intimidated; embrace the process and enjoy the delicious outcome.
This AMISH WHITE BREAD is incredibly versatile. It’s perfect for classic sandwiches, toasted with butter and jam for breakfast, or served alongside hearty soups and stews. For a special treat, try using it to make French toast or bread pudding. If you’re feeling adventurous, consider adding a sprinkle of herbs or a touch of honey to the dough for a subtle flavor variation. No matter how you choose to enjoy it, this AMISH WHITE BREAD is sure to become a family favorite.
Frequently Asked Questions:
Q: How long does AMISH WHITE BREAD stay fresh?
Properly stored, your AMISH WHITE BREAD should stay fresh at room temperature for about 3-4 days. For longer storage, you can slice the bread and freeze it for up to 3 months. Toasting slices directly from frozen works wonderfully.
Q: Can I make AMISH WHITE BREAD without a stand mixer?
Absolutely! While a stand mixer makes kneading easier, you can achieve excellent results with good old-fashioned hand kneading. It will take a bit more effort and time, but the outcome will be just as delicious. Just ensure you knead until the dough is smooth and elastic.
Q: What kind of flour is best for AMISH WHITE BREAD?
For this AMISH WHITE BREAD, all-purpose flour is generally recommended and readily available. Some bakers prefer to use bread flour for a slightly chewier texture, but all-purpose will yield a wonderfully soft and classic loaf.
Classic Amish White Bread Recipe – Easy & Delicious
A simple and delicious recipe for classic Amish white bread, perfect for beginners and experienced bakers alike. This soft, fluffy loaf is ideal for sandwiches, toast, or enjoying with butter.
Ingredients
-
1 cup warm water, (110-120°F)
-
⅓ cup granulated sugar
-
1 packet instant yeast (2 ¼ teaspoons)
-
3 cups all-purpose flour, plus more for dusting
-
¾ teaspoon salt
-
2 tablespoons vegetable or canola oil
-
2 tablespoons unsalted butter, melted
Instructions
-
Step 1
In a large mixing bowl, combine warm water and sugar. Sprinkle yeast over the top and let sit for 5-10 minutes until foamy. -
Step 2
Add flour and salt to the yeast mixture. Mix until a shaggy dough forms. -
Step 3
Knead the dough on a lightly floured surface for 8-10 minutes until smooth and elastic. Place in a greased bowl, cover, and let rise in a warm place for 1-1.5 hours until doubled. -
Step 4
Punch down the dough, gently knead for 30 seconds, then shape into a loaf. Place in a greased 9×5-inch loaf pan, cover, and let rise for 45-60 minutes until it has risen about 1 inch above the rim. -
Step 5
Preheat oven to 375°F (190°C). Whisk together melted butter and oil, then brush over the top of the risen dough. -
Step 6
Bake for 30-40 minutes until deep golden brown and internal temperature reaches 190-200°F (88-93°C). Tent with foil if browning too quickly. -
Step 7
Remove from oven, invert onto a wire rack, and cool completely before slicing.
Important Information
Nutrition Facts (Per Serving)
It is important to consider this information as approximate and not to use it as definitive health advice.
Allergy Information
Please check ingredients for potential allergens and consult a health professional if in doubt.