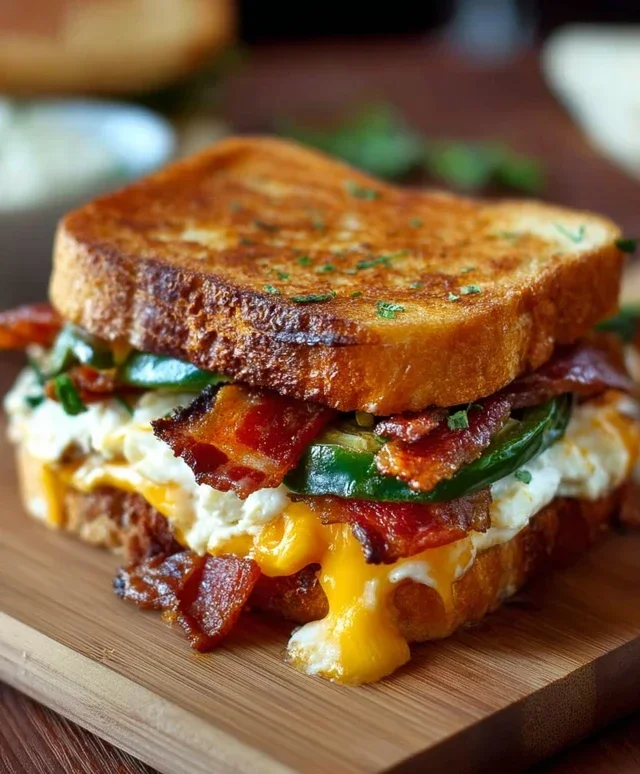
Cheesy Grilled Cheese Burrito Recipe-Ultimate Comfort Food
Grilled cheese burrito, the culinary mashup you never knew you needed, is about to become your new obsession. Imagin extracte all the comforting, gooey satisfaction of a perfectly grilled cheese sandwich, elevated and amplified by the portability and delightful texture of a warm tortilla. This isn’t just a sandwich; it’s a handheld hug, a flavor explosion, and a testament to the sheer joy of simple ingredients coming together in an extraordinary way. People flock to this creation for its undeniable comfort factor, that primal urge for melted cheese and toasted bread that speaks to our souls. But what truly sets the grilled cheese burrito apart is its versatility. It’s the ultimate blank canvas for your favorite fillings, transforming from a humble snack to a gourmet meal in mere minutes. Get ready to experience a truly magical blend of familiar favorites and exciting new possibilities.
Ingredients:
- 1 pound ground beef
- 1 tablespoon olive oil
- 1 medium onion, finely diced
- 1 teaspoon salt
- 1 teaspoon freshly ground black pepper
- 1 teaspoon smoked paprika
- 1 teaspoon dried oregano
- 1/2 cup tomato sauce
- 4 large (burrito-sized) flour tortillas
- 3 tablespoons spicy mayo (you can make your own by mixing 3 tablespoons mayonnaise with a teaspoon of sriracha or hot sauce, or use your favorite store-bought version)
- 1 cup pre-cooked fried rice (leftovers work wonderfully here, or you can quickly make a small batch)
- 1 cup nacho cheese sauce (warmed for easier spreading)
- 1 cup sour cream
- 1 cup crushed tortilla chips (for added crunch and texture)
Cooking the Beef Filling
Step 1: Searing the Ground Beef
Let’s begin extract by building the savory heart of our Grilled Cheese Burrito. Heat the tablespoon of olive oil in a large skillet or frying pan over medium-high heat. Once the oil is shimmering, add the pound of ground beef. Break up the beef with a spatula and cook, stirring occasionally, until it’s browned all over. This searing process is crucial for developing rich flavor. Drain off any excess grease from the skillet, leaving just a little to help sauté the onions.
Step 2: Infusing Flavor with Aromatics and Spices
Now it’s time to add our aromatics and spices. Add the finely diced onion to the skillet with the browned ground beef. Cook, stirring, until the onions have softened and become translucent, which usually takes about 5-7 minutes. Don’t rush this step; softened onions add a lovely sweetness and depth to the filling. Next, sprinkle in the salt, black pepper, smoked paprika, and dried oregano. Stir everything well to coat the beef and onions evenly. Cook for another minute, allowing the spices to bloom and release their fragrant oils. This aromatic foundation is key to a delicious filling.
Step 3: Simmering the Beef Mixture
Pour in the 1/2 cup of tomato sauce. Stir it into the beef and onion mixture, ensuring everything is well combined. Bring the mixture to a gentle simmer, then reduce the heat to low. Let it cook for about 10-15 minutes, stirring occasionally, allowing the flavors to meld and the sauce to thicken slightly. This slow simmer transforms the ingredients into a cohesive and flavorful filling. You want a consistency that isn’t too watery but holds together well inside the burrito. Taste and adjust seasonings if needed; sometimes a pinch more salt or pepper makes all the difference.
Assembling and Grilling the Burritos
Step 4: Preparing the Tortillas for Filling
While the beef filling is simmering, prepare your tortillas. Lay out the four large flour tortillas on a clean surface. We’re going to slightly warm them to make them more pliable and less likely to tear when we roll them up. You can do this by briefly heating them in a dry skillet over medium heat for about 30 seconds per side, or by wrapping them in a damp paper towel and microwaving them for about 20-30 seconds. The goal is warm and flexible, not crispy.
Step 5: Layering the Delicious Fillings
Now for the exciting part – assembling your Grilled Cheese Burrito! Spread about a tablespoon of the spicy mayo evenly over the surface of each warmed tortilla, leaving a small border around the edges. This mayo adds a creamy kick and a bit of a binder. Next, spoon a generous portion of the savory ground beef mixture onto one half of each tortilla. Be careful not to overfill, or you’ll have a hard time rolling. On top of the beef, spoon about 1/4 cup of the warm nacho cheese sauce. This is where the “cheese” in Grilled Cheese Burrito truly comes to life. Then, add a layer of the pre-cooked fried rice. The rice adds a fantastic texture and a unique twist. Finally, sprinkle a handful of crushed tortilla chips over the rice and cheese for that irresistible crunch. This combination of savory beef, gooey cheese, fluffy rice, and crunchy chips is pure magic.
Step 6: Rolling and Grilling to Golden Perfection
Once each tortilla is loaded, it’s time to roll. Fold in the sides of the tortilla over the filling, then tightly roll up from the bottom. Tuck in the filling as you roll to create a compact package. Now, heat a clean, large skillet or griddle over medium heat. You can add a tiny bit of butter or oil if you like, but it’s often not necessary if your skillet is well-seasoned. Place the rolled burritos seam-side down onto the hot skillet. Grill for about 3-5 minutes per side, or until the tortillas are golden brown and crispy, and the cheese inside is melted and gooey. Keep an eye on them to prevent burning. This grilling process seals everything together and creates that irresistible grilled exterior.
Step 7: The Finishing Touches and Serving
After grilling, carefully remove the burritos from the skillet. Let them rest for just a minute – this allows the fillings to settle and makes them easier to slice. Cut each burrito in half, if desired, to reveal the glorious layers within. Serve immediately with a dollop of cool sour cream on the side for dipping and to balance the richness. The contrast between the warm, cheesy, savory interior and the crispy grilled exterior, with the cool sour cream, is what makes this Grilled Cheese Burrito an absolute winner. Enjoy every delicious bite!
Conclusion:
And there you have it – the magnificent Grilled Cheese Burrito! We’ve walked through the simple steps to create this incredibly satisfying and surprisingly versatile dish. This fusion of classic comfort foods is sure to become a new favorite in your recipe rotation. Whether you’re looking for a quick weeknight dinner or an impressive lunch, the Grilled Cheese Burrito delivers on flavor and ease.
For serving suggestions, consider pairing your Grilled Cheese Burrito with a side of salsa, sour cream, or guacamole for an extra burst of freshness. A simple side salad also provides a nice contrast to the richness of the burrito. Don’t be afraid to get creative with variations! Experiment with different cheeses like pepper jack for a kick, or add in some seasoned ground beef, shredded chicken, or black beans for a heartier meal. You can even add a thin layer of your favorite hot sauce inside before grilling for a spicy twist.
We encourage you to give this recipe a try. It’s a testament to how simple ingredients can come together to create something truly special. We’re confident that once you taste the gooey, cheesy goodness of the Grilled Cheese Burrito, you’ll be hooked!
Frequently Asked Questions:
Q: What is the best type of cheese to use for a Grilled Cheese Burrito?
A: While a classic cheddar and Monterey Jack blend works wonderfully for that perfect melty stretch, feel free to experiment! Gruyere, provolone, or even a sharp white cheddar can add unique flavor profiles. For a bit of spice, consider pepper jack.
Q: Can I make the Grilled Cheese Burrito ahead of time?
A: It’s best enjoyed fresh to ensure the cheese is perfectly melted and the tortilla is crispy. However, you can prepare the filling components ahead of time and assemble and grill just before serving.
Cheesy Grilled Cheese Burrito
An ultimate comfort food recipe for a cheesy grilled cheese burrito packed with savory ground beef, gooey nacho cheese, fried rice, and crunchy tortilla chips.
Ingredients
-
1 pound ground beef
-
1 tablespoon olive oil
-
1 medium onion, finely diced
-
1 teaspoon salt
-
1 teaspoon freshly ground black pepper
-
1 teaspoon smoked paprika
-
1 teaspoon dried oregano
-
1/2 cup tomato sauce
-
4 large flour tortillas
-
3 tablespoons spicy mayo
-
1 cup pre-cooked fried rice
-
1 cup nacho cheese sauce
-
1 cup sour cream
-
1 cup crushed tortilla chips
Instructions
-
Step 1
Heat olive oil in a large skillet over medium-high heat. Add ground beef and cook, stirring, until browned. Drain excess grease. -
Step 2
Add diced onion to the skillet and cook until softened, about 5-7 minutes. Stir in salt, black pepper, smoked paprika, and dried oregano. Cook for another minute. -
Step 3
Pour in tomato sauce, stir to combine, and bring to a simmer. Reduce heat to low and cook for 10-15 minutes, stirring occasionally, until the sauce thickens slightly. -
Step 4
Warm tortillas in a dry skillet or microwave to make them pliable. Spread spicy mayo evenly over each tortilla, leaving a border. -
Step 5
Spoon a portion of the beef mixture onto one half of each tortilla. Top with nacho cheese sauce, fried rice, and crushed tortilla chips. -
Step 6
Fold in the sides of the tortilla, then tightly roll up from the bottom. Heat a clean skillet or griddle over medium heat. Grill burritos seam-side down for 3-5 minutes per side until golden brown and crispy. -
Step 7
Let burritos rest for a minute, then cut in half if desired. Serve immediately with sour cream for dipping.
Important Information
Nutrition Facts (Per Serving)
It is important to consider this information as approximate and not to use it as definitive health advice.
Allergy Information
Please check ingredients for potential allergens and consult a health professional if in doubt.