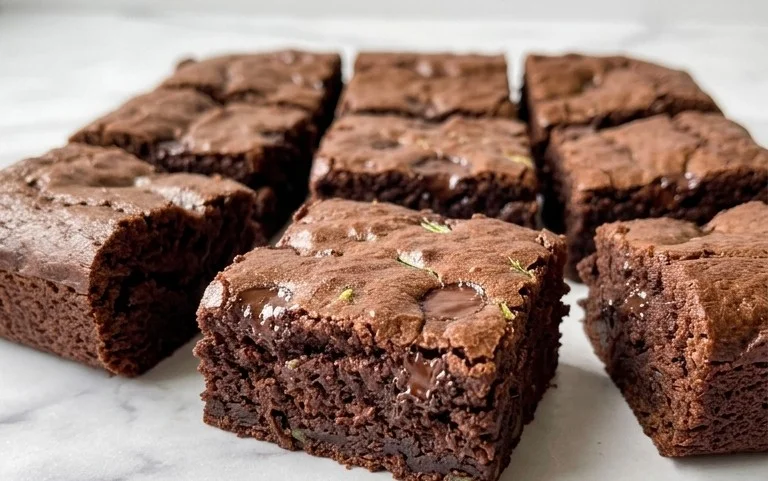
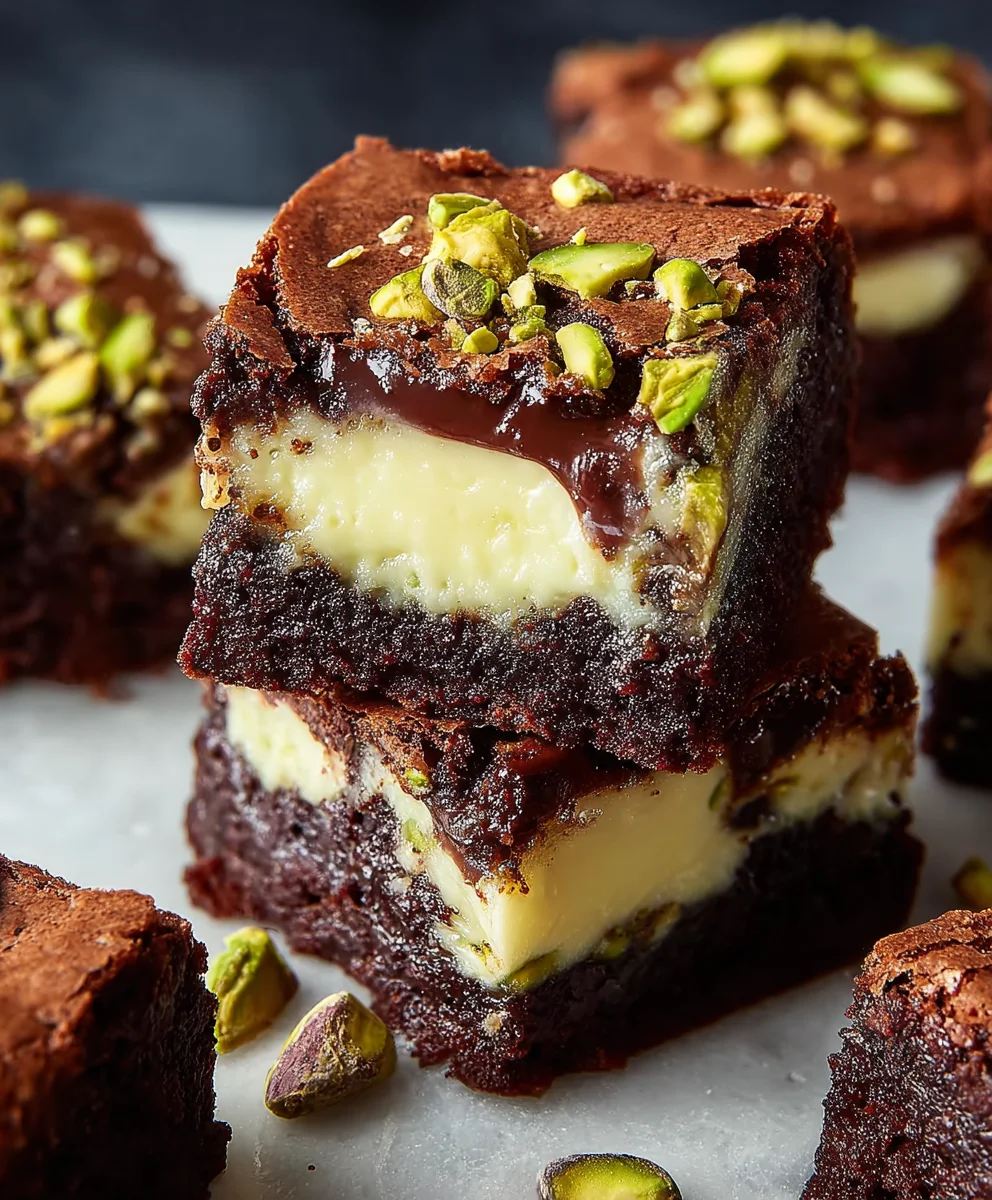
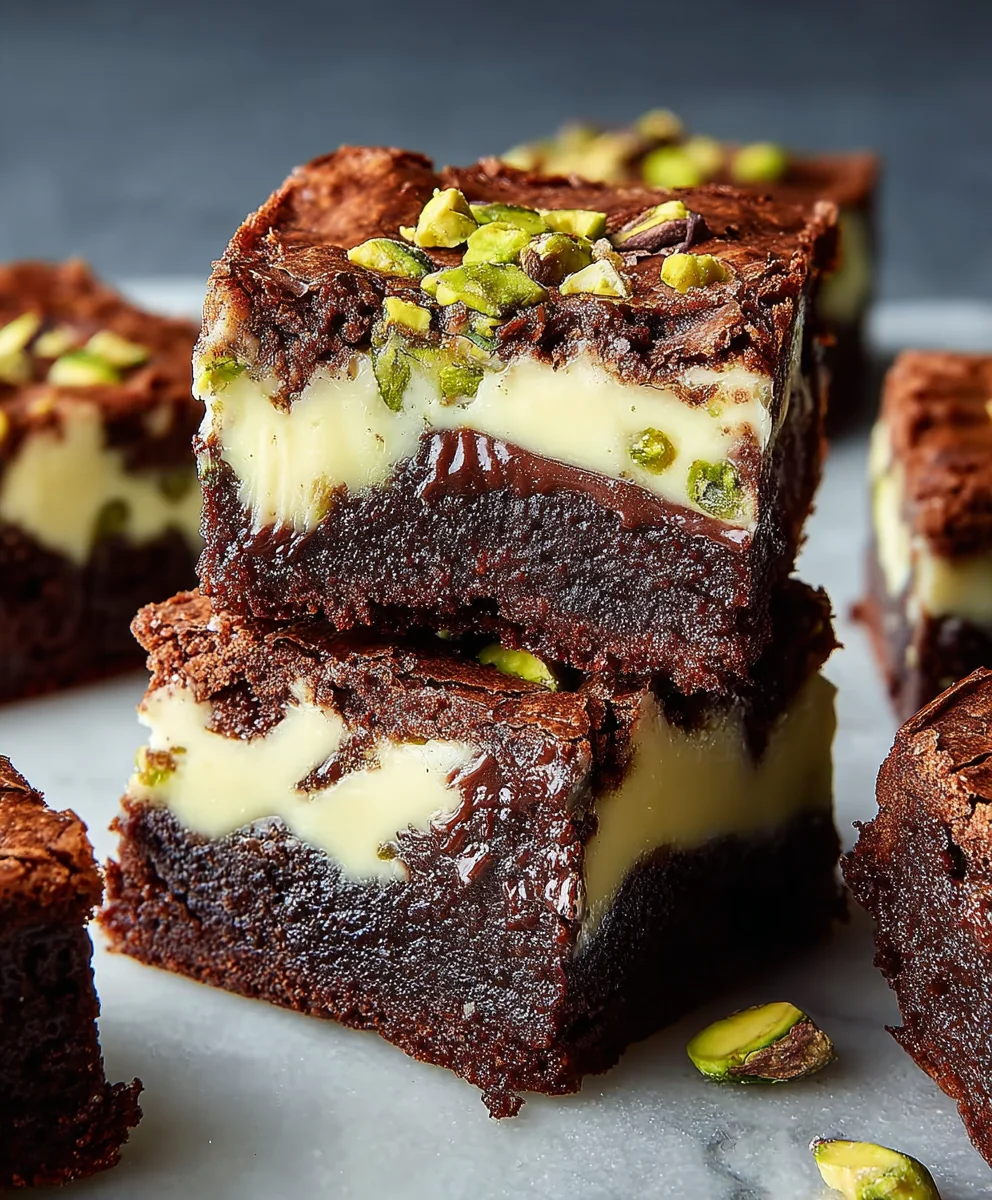
Pistachio Cheesecake Brownies – Decadent & Delicious
Pistachio Cheesecake Brownies are a culinary masterpiece that will have your taste buds singin extragin extract. Imagine the rich, fudgy decadence of a perfect brownie meeting the creamy, tangy delight of a classic cheesecake, all elevated by the unique, subtly sweet crunch of pistachios. It’s a flavor combination that sounds almost too good to be true, but trust me, it’s a harmonious marriage of textures and tastes that makes these bars utterly irresistible. What is it about these glorious treats that captivates everyone? Perhaps it’s the sophisticated twist on familiar favorites, offering a gourmet experience without the fuss. The vibrant green hue of the pistachios not only adds visual appeal but also imparts a delicate, nutty aroma that complements the deep chocolate and smooth cheesecake layers beautifully. These Pistachio Cheesecake Brownies aren’t just a dessert; they’re an experience, a delightful escape into a world of pure, unadulterated deliciousness.
Ingredients:
- 3/4 cup unsalted butter, plus extra for greasing
- 6 oz dark chocolate (50-60% cocoa), finely chopped
- 1 1/4 cups all-purpose flour, plus a little extra for dusting
- 1/2 cup unsweetened cocoa powder
- 3 medium eggs, at room temperature
- 1 cup granulated sugar
- 1/3 cup light brown sugar, packed
- 1 tablespoon vanilla extract, divided
- 1/4 teaspoon salt
- 2 oz dark chocolate (50-60% cocoa) for topping, chopped
- 8 oz full-fat cream cheese, softened
- 1/3 cup granulated sugar (for cheesecake layer)
- 1 small/medium egg (for cheesecake layer), at room temperature
- 1 teaspoon vanilla extract (for cheesecake layer)
- 1 heaped tablespoon all-purpose flour (for cheesecake layer)
- 1/2 cup shelled pistachios, roughly chopped (for topping)
Preparing the Brownie Base
Step 1: Melt the Chocolate and Butter
Begin extract by preparing your baking pan. I like to use an 8×8 inch square pan. Grease it generously with butter, then line it with parchment paper, leaving some overhang on the sides. This overhang will act as handles, making it super easy to lift the finished brownies out of the pan. Now, in a heatproof bowl set over a saucepan of simmering water (a double boiler setup), combine the 3/4 cup of unsalted butter and the 6 oz of finely chopped dark chocolate. Stir occasionally until everything is completely melted and smooth. Make sure the bottom of the bowl isn’t touching the water, as direct heat can scorch your chocolate. Once melted and glossy, remove the bowl from the heat and let it cool slightly for about 5-10 minutes. This prevents the chocolate from cooking the eggs when you add them.
Step 2: Combine Dry Ingredients and Wet Ingredients
While the chocolate mixture cools, in a separate medium bowl, whisk together the 1 1/4 cups of all-purpose flour, the 1/2 cup of cocoa powder, and the 1/4 teaspoon of salt. Whisking them together now ensures that the cocoa powder and salt are evenly distributed throughout the flour, preventing any clumps or pockets of salt in your brownies. In a large bowl, whisk together the 1 cup of granulated sugar, the 1/3 cup of light brown sugar, and the 3 medium eggs. Add 1 tablespoon of vanilla extract. Whisk vigorously until the mixture is well combined and slightly lighter in color. Don’t over-beat at this stage; we’re just looking for a homogenous mixture.
Step 3: Create the Rich Brownie Batter
Now, it’s time to bring everything together. Pour the slightly cooled melted chocolate and butter mixture into the bowl with the sugar and egg mixture. Gently fold them together using a spatula until just combined. Be careful not to overmix, as this can lead to tough brownies. Next, gradually add the dry ingredients (the flour, cocoa powder, and salt mixture) to the wet ingredients. Fold them in until no dry streaks of flour remain. Again, resist the urge to overmix; a few small lumps are perfectly fine. The batter will be thick and fudgy – exactly what we want for decadent brownies. Spread this glorious brownie batter evenly into your prepared baking pan, smoothing the top with your spatula.
Crafting the Creamy Pistachio Cheesecake Swirl
Step 4: Prepare the Cheesecake Mixture
In a medium bowl, beat the 8 oz of softened full-fat cream cheese with an electric mixer until it’s completely smooth and creamy. Make sure there are no lumps. Add the 1/3 cup of granulated sugar (for the cheesecake layer) and the 1 teaspoon of vanilla extract. Beat again until well combined and fluffy. Then, add the 1 small/medium egg and the 1 heaped tablespoon of all-purpose flour. Beat on low speed until just incorporated. Over-beating the cheesecake mixture can incorporate too much air, which can cause it to puff up and then crack excessively during baking. We want a smooth, creamy layer.
Step 5: Swirl and Top for Perfection
Dollop spoonfuls of the cheesecake mixture evenly over the brownie batter in the pan. Don’t worry about perfect placement at this stage. Now, take a skewer or a butter knife and gently swirl the cheesecake mixture into the brownie batter. Make figure-eight motions or simple swirls, creating a marbled effect. Don’t over-swirl, or the layers will blend too much. We want distinct swirls of both textures. Once you’re happy with the marbling, sprinkle the 2 oz of chopped dark chocolate evenly over the top. Finally, scatter the 1/2 cup of roughly chopped pistachios over the chocolate. The pistachios will add a delightful crunch and a beautiful pop of color.
Baking and Cooling for Optimal Texture
Step 6: Bake and Cool
Place the pan into a preheated oven at 350°F (175°C). Bake for approximately 25-30 minutes, or until the edges of the brownies are set and a toothpick inserted into the center comes out with moist crum extractbs attached, not wet batter. The cheesecake layer should also look set. Avoid over-baking, as this will result in dry brownies. Once baked, remove the pan from the oven and let it cool completely on a wire rack. This is a crucial step for achieving the perfect fudgy texture and allowing the flavors to meld. Once cooled, use the parchment paper overhang to carefully lift the entire brownie slab out of the pan. For the cleanest cuts, chill the brownies in the refrigerator for at least 30 minutes before slicing into squares. Enjoy these incredible Pistachio Cheesecake Brownies!
Conclusion:
And there you have it – the ultimate guide to creating decadent Pistachio Cheesecake Brownies! We’ve walked through each step, from achieving that perfectly swirled cheesecake topping to ensuring a fudgy brownie base. These Pistachio Cheesecake Brownies are a true showstopper, offering a delightful contrast of textures and flavors. The nutty crunch of pistachios beautifully complements the rich chocolate and creamy cheesecake, creating a dessert that’s both sophisticated and incredibly satisfying.
For serving, I love these Pistachio Cheesecake Brownies just as they are, perhaps with a dusting of powdered sugar or a drizzle of extra chocolate sauce. They also pair wonderfully with a scoop of vanilla bean ice cream or a dollop of fresh whipped cream. Get creative with variations! You could add a pinch of cardamom to the brownie batter for an extra layer of warmth, or perhaps some chopped white chocolate for a sweeter twist. Don’t be afraid to experiment and make these Pistachio Cheesecake Brownies your own! I truly hope you enjoy baking and, more importantly, devouring these delightful treats. Happy baking!
Frequently Asked Questions:
Q1: How should I store leftover Pistachio Cheesecake Brownies?
Leftover Pistachio Cheesecake Brownies can be stored in an airtight container at room temperature for up to 2 days, or in the refrigerator for up to 5 days. For longer storage, you can wrap individual brownies tightly in plastic wrap and then place them in a freezer-safe bag or container for up to 3 months. Thaw them in the refrigerator overnight before enjoying.
Q2: Can I use pre-shelled pistachios for this recipe?
Yes, absolutely! Using pre-shelled pistachios is perfectly fine and will save you time. Ensure they are unsalted, as the salt content can affect the overall flavor of the Pistachio Cheesecake Brownies. If your pre-shelled pistachios are salted, you might want to reduce the added salt in the brownie batter slightly.
Pistachio Cheesecake Brownies – Decadent & Delicious
Rich, fudgy brownies swirled with creamy pistachio cheesecake and topped with crunchy pistachios and dark chocolate. A truly decadent treat!
Ingredients
-
3/4 cup unsalted butter
-
6 oz dark chocolate (50-60% cocoa), finely chopped
-
1 1/4 cups all-purpose flour
-
1/2 cup unsweetened cocoa powder
-
3 medium eggs, at room temperature
-
1 cup granulated sugar
-
1/3 cup light brown sugar, packed
-
1 tablespoon vanilla extract, divided
-
1/4 teaspoon salt
-
2 oz dark chocolate (50-60% cocoa) for topping, chopped
-
8 oz full-fat cream cheese, softened
-
1/3 cup granulated sugar (for cheesecake layer)
-
1 small/medium egg (for cheesecake layer), at room temperature
-
1 teaspoon vanilla extract (for cheesecake layer)
-
1 heaped tablespoon all-purpose flour (for cheesecake layer)
-
1/2 cup shelled pistachios, roughly chopped (for topping)
Instructions
-
Step 1
Prepare an 8×8 inch pan by greasing and lining with parchment paper, leaving overhangs. Melt 3/4 cup butter and 6 oz dark chocolate in a double boiler until smooth. Let cool slightly. -
Step 2
In a medium bowl, whisk together 1 1/4 cups flour, 1/2 cup cocoa powder, and 1/4 tsp salt. In a large bowl, whisk 1 cup granulated sugar, 1/3 cup brown sugar, 3 eggs, and 1 tbsp vanilla extract until combined. -
Step 3
Pour cooled chocolate mixture into the sugar-egg mixture and fold gently. Gradually fold in the dry ingredients until just combined. Spread batter evenly into the prepared pan. -
Step 4
For the cheesecake layer: Beat 8 oz cream cheese until smooth. Add 1/3 cup granulated sugar, 1 tsp vanilla extract, 1 small egg, and 1 tbsp flour. Beat on low speed until just incorporated. -
Step 5
Dollop cheesecake mixture over brownie batter. Swirl gently with a skewer or knife to create a marbled effect. Sprinkle 2 oz chopped dark chocolate and 1/2 cup chopped pistachios over the top. -
Step 6
Bake at 350°F (175°C) for 25-30 minutes, or until edges are set and a toothpick has moist crumbs. Cool completely on a wire rack, then chill for at least 30 minutes before slicing.
Important Information
Nutrition Facts (Per Serving)
It is important to consider this information as approximate and not to use it as definitive health advice.
Allergy Information
Please check ingredients for potential allergens and consult a health professional if in doubt.