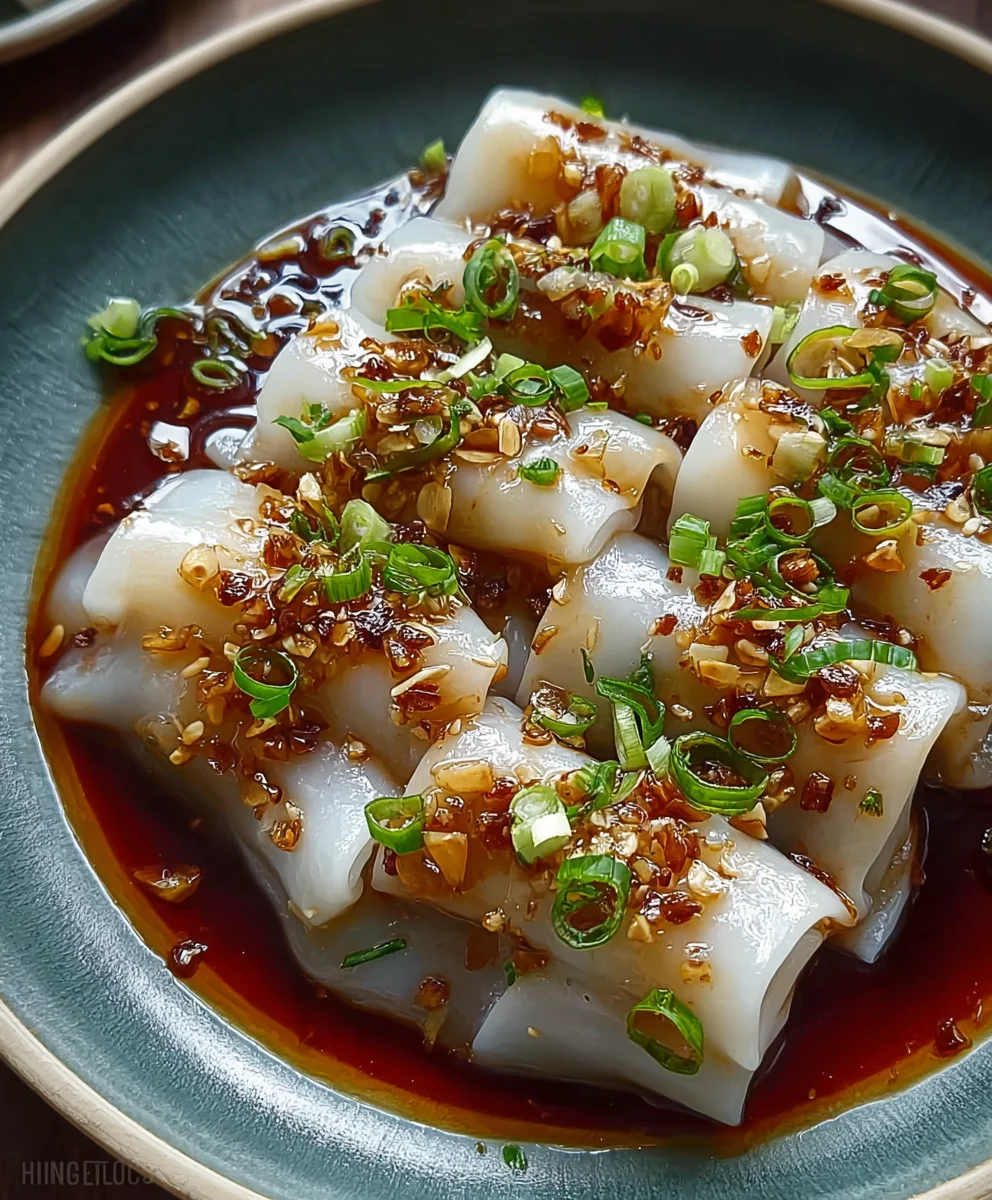
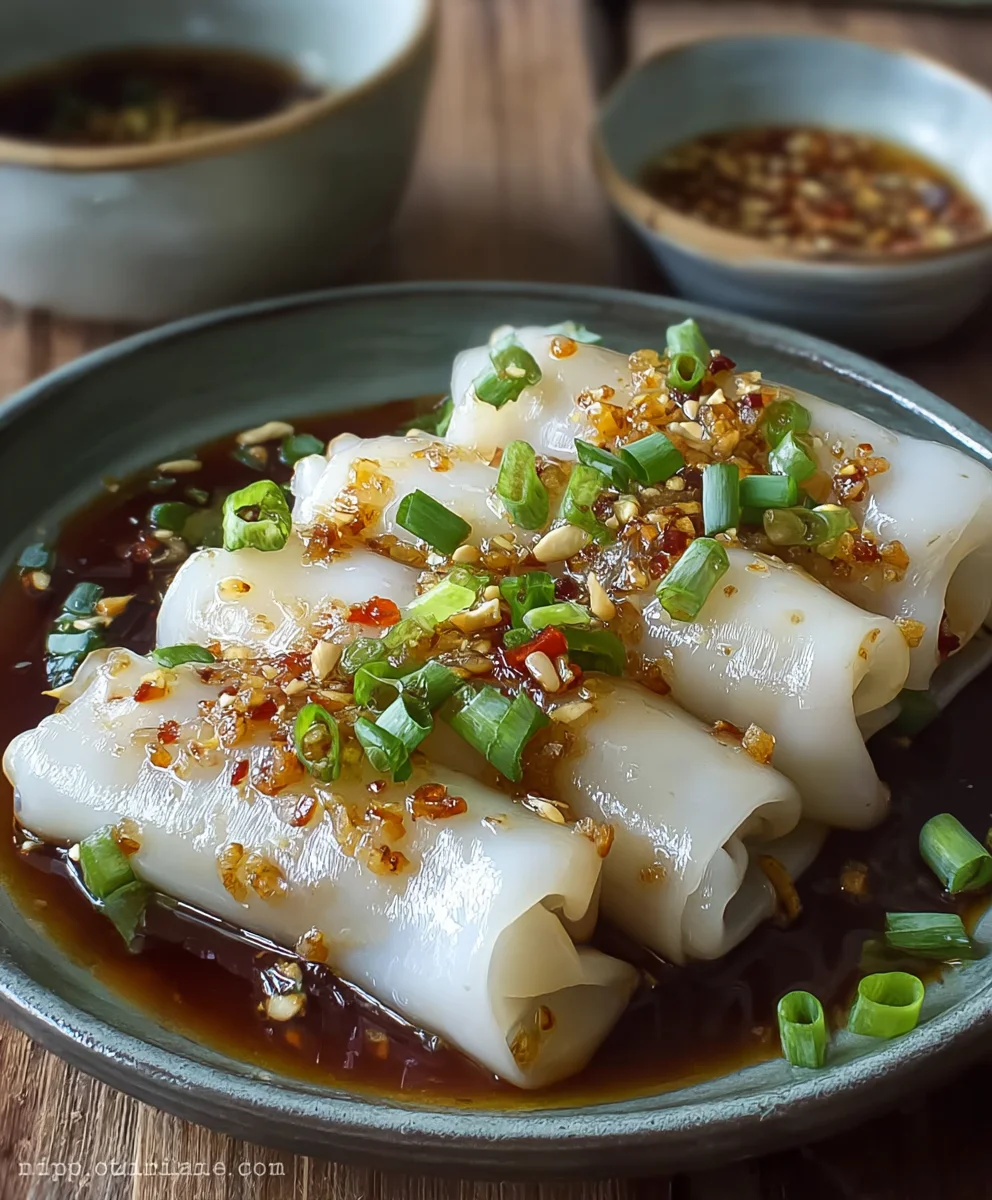
Steamed Beef Cheung Fun – Easy Homemade Rice Noodle Rolls
Cheung Fun, those silken rice noodle rolls, are an absolute delight, a staple that sparks pure joy in dim sum gatherings and breakfast stalls alike. What is it about this seemingly simple dish that captures our hearts and taste buds so profoundly? It’s the non-intoxicating dance of textures and flavors: the impossibly smooth, delicate rice noodle wrapper, often steamed to translucent perfection, yielding to a savory, often meaty or shrimp-filled interior. The magic of Cheung Fun lies not just in its inherent deliciousness, but in its versatility and the comforting nostalgia it evokes. Whether you find yourself craving the classic Cantonese rendition with plump shrimp or savory char siu, or you’re eager to explore variations, this recipe will guide you to creating authentic, restaurant-quality Cheung Fun right in your own kitchen, ensuring every bite is a moment of pure, unadulterated bliss.
Ingredients:
- 1 cup rice flour (for the batter)
- ⅓ cup tapioca starch (for the batter)
- 3 cups water (for the batter)
- 1 tsp cooking oil (for the batter)
- Pinch of salt (for the batter)
- Cooked shrimp, diced (optional filling)
- Minced beef or beef, cooked (optional filling)
- Fried shallots (to garnish)
- 3 tbsp soy sauce (for dipping sauce)
- 1 tbsp water (for dipping sauce)
- 1 tsp sugar (for dipping sauce)
- 1 tsp sesame oil (for dipping sauce)
Preparing the Cheung Fun Batter
The foundation of delicious Cheung Fun lies in a perfectly silky and smooth batter. In a medium-sized bowl, combine the rice flour and tapioca starch. These two flours work in harmony to create the characteristic chewy yet tender texture of the rice noodle sheets. Rice flour provides the primary structure, while tapioca starch contributes to its characteristic glossiness and elasticity. Whisk them together thoroughly to ensure there are no clumps. Gradually add the 3 cups of water while continuously whisking. It’s important to add the water slowly at first to prevent lumps from forming. Once all the water is incorporated, you should have a thin, milky liquid. Add the teaspoon of cooking oil and a pinch of salt. The cooking oil helps prevent the noodles from sticking to the steaming tray and contributes to a smoother finish. The salt enhances the overall flavor. Stir everything together until well combined. Let this batter rest for at least 15-30 minutes at room temperature. This resting period allows the starches to fully hydrate, leading to a better texture when steamed. You can even prepare the batter a few hours ahead and refrigerate it; just bring it back to room temperature and give it a good whisk before using.
Setting Up for Steaming
You will need a shallow, rectangular metal tray for steaming. A common size is around 8×10 inches, but you can use what you have, adjusting steaming times as needed. Lightly grease the inside of your steaming tray with a little bit of cooking oil. This is crucial to ensure the Cheung Fun releases easily after steaming. Prepare your steamer by filling it with enough water to last throughout the steaming process. Bring the water to a rolling boil over medium-high heat. You want a good amount of steam to cook the noodles quickly and evenly. Have your fillings, such as the diced cooked shrimp or cooked minced beef, ready and within easy reach. If you are using fillings, sprinkle them lightly over the greased tray before adding the batter in some areas, or add them on top of the batter once it’s spread thinly in the tray. For the dipping sauce, in a small bowl, combine the 3 tablespoons of soy sauce, 1 tablespoon of water, 1 teaspoon of sugar, and 1 teaspoon of sesame oil. Stir until the sugar is dissolved. This simple sauce balances the richness of the noodles and any fillings.
Steaming the Rice Noodles
Now comes the exciting part – steaming! Give your rested batter a final vigorous whisk to ensure it’s smooth and homogenous. Place the greased metal tray onto the rack inside your preheated steamer. Ladle a thin layer of the Cheung Fun batter into the tray. You want the batter to spread out thinly to create delicate noodles. Aim for a layer that’s about 1/8 to 1/4 inch thick. If you are adding fillings, now is the time to sprinkle them evenly over the batter in the tray. Try not to overfill the tray with batter, as this will result in very thick noodles that are harder to manage and less appealing in texture. Carefully place the tray into the steaming basket over the boiling water. Cover the steamer tightly to trap all the steam. Steam for approximately 3-5 minutes, or until the noodle sheet is translucent and firm to the touch. You will see the batter turn from opaque white to a slightly shiny, translucent appearance, indicating it’s cooked through.
Rolling the Cheung Fun
Once the noodle sheet is cooked and appears translucent, carefully remove the steaming tray from the steamer using oven mitts. The tray will be very hot. Let it sit for just about 30 seconds to a minute to allow it to cool slightly, making it easier to handle. Then, using a spatula or a bench scraper, carefully scrape one edge of the cooked noodle sheet towards the center. Gently roll the noodle sheet up, starting from the scraped edge, into a log shape. The slight cooling period helps the noodle to set just enough to be rolled without tearing. Be patient and gentle; the aim is to create a neat, cylindrical roll. If the noodle sheet feels too sticky, you can lightly grease your spatula or scraper with a little oil. Once rolled, carefully slide the Cheung Fun log out of the tray onto a clean serving plate. Repeat this process with the remaining batter and fillings, stacking the rolled Cheung Fun on the serving plate as you go.
Serving and Garnishing
Arrange the freshly steamed Cheung Fun on your serving platter. If you’ve made multiple rolls, you can place them side-by-side or stacked. The warm, soft noodles are best enjoyed immediately after steaming. To finish the dish and add that authentic touch, generously sprinkle the fried shallots over the Cheung Fun. The crispy, savory fried shallots provide a wonderful textural contrast and an aromatic depth of flavor that is synonymous with this dish. Drizzle a little of the prepared soy sauce dipping sauce over the top, or serve the sauce on the side in a small dipping bowl, allowing everyone to customize their own portion. The simple yet flavorful soy sauce mixture enhances the subtle taste of the rice noodles and complements any fillings you may have included. You can also add a touch of chili oil to the dipping sauce for a bit of heat, if desired. This Cheung Fun is a delightful appetizer or a light, satisfying meal on its own.
Conclusion:
And there you have it! We’ve successfully navigated the art of making delicious Cheung Fun right in your own kitchen. This versatile dish, with its silky smooth texture and satisfying chew, is a testament to the simple beauty of rice noodle rolls. Whether you’re enjoying them as a dim sum classic or a light meal, the satisfaction of creating them from scratch is truly rewarding. I encourage you to give this recipe a try; it’s more approachable than you might think and the results are absolutely worth the effort. Don’t be afraid to experiment and make this recipe your own – the joy of cooking lies in personalization!
For serving, I highly recommend drizzling your freshly made Cheung Fun with a good quality soy sauce, a touch of sesame oil, and perhaps a sprinkle of toasted sesame seeds. A side of chili oil is also a fantastic addition for those who enjoy a little heat. You can also serve them alongside your favorite stir-fries or as part of a larger dim sum spread. For variations, consider adding finely chopped scallions or cilantro to the batter, or even filling the rolls with shrimp, beef, or mushrooms before steaming for a heartier option.
Frequently Asked Questions about Cheung Fun:
Can I make Cheung Fun without a special steamer?
Yes, you can! While a dedicated steamer makes things easier, you can improvise. Use a large, shallow baking pan and place it on top of a wok or a large pot filled with simmering water. You’ll steam the rice noodle sheets in portions in the baking pan, carefully transferring them to the wok/pot to cook.
How can I store leftover Cheung Fun?
Leftover Cheung Fun can be stored in an airtight container in the refrigerator for up to 2-3 days. However, they are best enjoyed fresh. When reheating, it’s recommended to steam them briefly to revive their soft texture, as microwaving can sometimes make them a bit rubbery.
Steamed Beef Cheung Fun – Easy Homemade Rice Noodle Rolls
Learn how to make delicious and easy homemade Steamed Beef Cheung Fun (Rice Noodle Rolls) with this simple recipe. Perfect for a delightful appetizer or a light meal.
Ingredients
-
1 cup rice flour (for the batter)
-
1/3 cup tapioca starch (for the batter)
-
3 cups water (for the batter)
-
1 tsp cooking oil (for the batter)
-
Pinch of salt (for the batter)
-
Cooked minced beef (optional filling)
-
Fried shallots (to garnish)
-
3 tbsp soy sauce (for dipping sauce)
-
1 tbsp water (for dipping sauce)
-
1 tsp sugar (for dipping sauce)
-
1 tsp sesame oil (for dipping sauce)
Instructions
-
Step 1
Prepare the Cheung Fun batter: In a bowl, whisk together rice flour and tapioca starch. Gradually add water while whisking until smooth. Stir in cooking oil and salt. Let the batter rest for 15-30 minutes. -
Step 2
Set up for steaming: Lightly grease a shallow, rectangular metal tray. Fill your steamer with water and bring it to a rolling boil. Prepare the dipping sauce by combining soy sauce, water, sugar, and sesame oil in a small bowl. -
Step 3
Steam the rice noodles: Whisk the batter again. Ladle a thin layer of batter into the greased tray. If using beef filling, sprinkle it over the batter. Place the tray in the steamer and cover. Steam for 3-5 minutes until translucent and firm. -
Step 4
Roll the Cheung Fun: Carefully remove the hot tray from the steamer. Let it cool slightly for about 30 seconds to a minute. Using a spatula, scrape one edge of the noodle sheet and gently roll it into a log shape. -
Step 5
Serve and garnish: Slide the rolled Cheung Fun onto a serving plate. Repeat with remaining batter. Arrange the rolls, sprinkle generously with fried shallots, and drizzle with or serve alongside the prepared dipping sauce.
Important Information
Nutrition Facts (Per Serving)
It is important to consider this information as approximate and not to use it as definitive health advice.
Allergy Information
Please check ingredients for potential allergens and consult a health professional if in doubt.