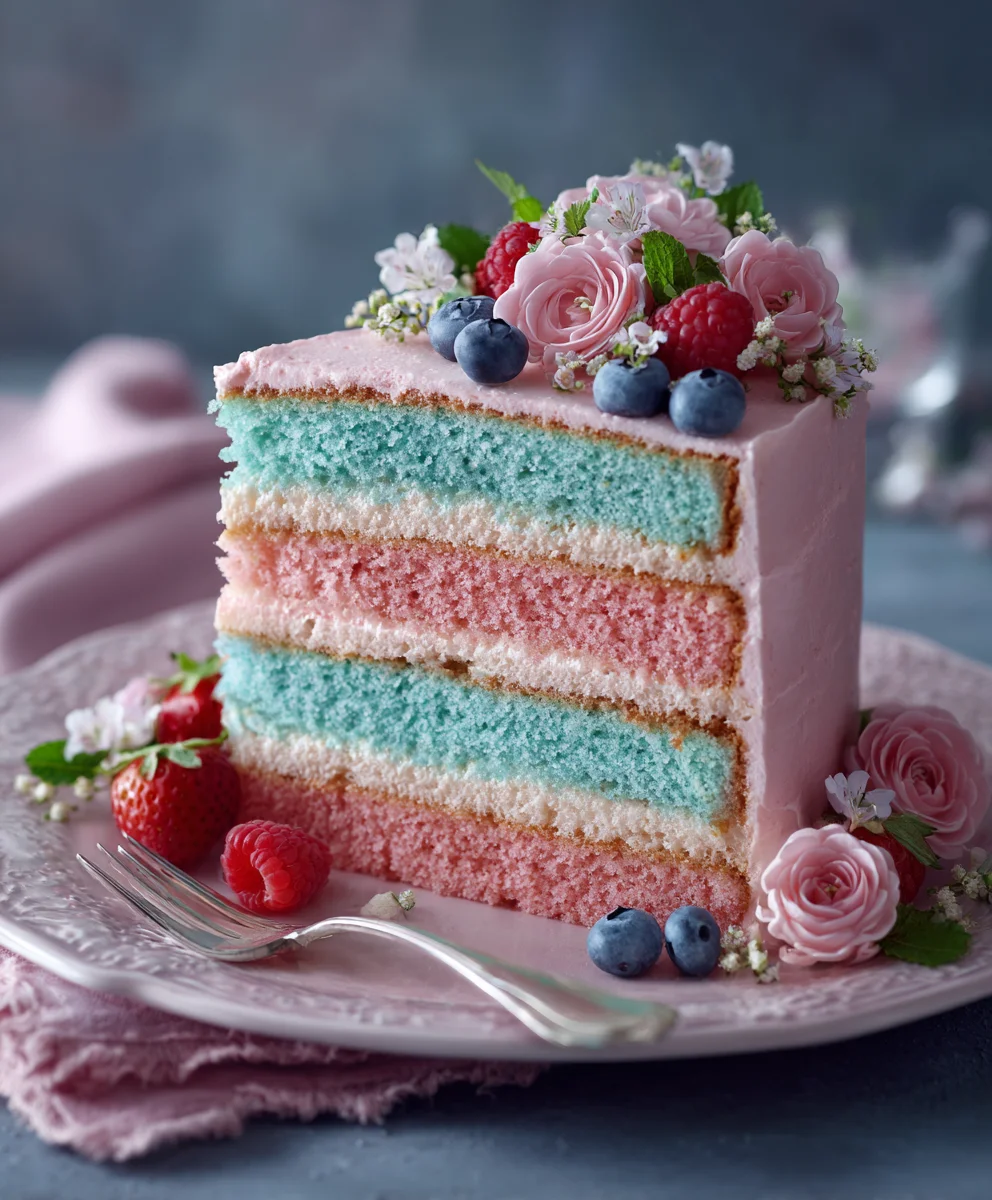
Coquette Party Dreamy Pink Blue Bites – Easy Recipe
Dreamy Pink & Blue Coquette Party recipes are more than just food; they’re an invitation to a whimsical celebration! Imagin extracte a gathering where every bite transports you to a pastel wonderland, evoking that irresistible coquette charm that’s both playful and sophisticated. This isn’t your average potluck fare; it’s about creating an experience, a delightful aesthetic that delights the eyes as much as it does the palate. People adore these dishes because they tap into a sense of childlike wonder, softened with a touch of grown-up elegance. The magic lies in the delicate balance of sweet and subtly tart flavors, combined with visually stunning presentation. Get ready to fall in love with a culinary theme that’s utterly enchanting and guaranteed to make your next event unforgettable.
What Makes These Treats So Special?
The true allure of a Dreamy Pink & Blue Coquette Party lies in its ability to blend vibrant aesthetics with delicious, accessible flavors. We’re talking about dishes that are not only Instagram-worthy but genuinely satisfying. Forget complicated techniques; our focus is on simple ingredients transformed into edible art. From airy mousses to delicate cookies, each recipe is designed to be approachable, ensuring anyone can create a stunning spread. The playful color pnon-alcoholic alette inspires creativity, allowing you to infuse personality into every creation. It’s about making memories and sharing joy, one beautifully crafted bite at a time.
Ingredients:
- 2 cups all-purpose flour
- 1 teaspoon baking powder
- 1/2 teaspoon baking soda
- 1/4 teaspoon salt
- 1 cup (2 sticks) unsalted butter, softened
- 1 1/2 cups granulated sugar
- 2 large eggs
- 1 teaspoon vanilla extract
- 1/4 cup milk
- Pink gel food coloring
- Blue gel food coloring
- Powdered sugar, for dusting
- Optional: Sprinkles in coordinating pink and blue shades
Preparing the Dough
Step 1: Dry Ingredient Mix
Begin extract by gathering all your dry ingredients. In a medium-sized bowl, whisk together the 2 cups of all-purpose flour, 1 teaspoon of baking powder, 1/2 teaspoon of baking soda, and 1/4 teaspoon of salt. Whisking these ingredients thoroughly ensures that the leavening agents and salt are evenly distributed throughout the flour, which is crucial for consistent cookie texture and rise. Once combined, set this bowl aside.
Step 2: Creaming Butter and Sugar
In a large mixing bowl, cream together the 1 cup (2 sticks) of softened unsalted butter and 1 1/2 cups of granulated sugar. This is a vital step for achieving tender cookies. Use an electric mixer on medium-high speed and beat until the mixture is light, fluffy, and pnon-alcoholic ale yellow in color. This process incorporates air into the dough, contributing to the cookie’s delicate crum extractb. Scrape down the sides of the bowl occasionally to ensure everything is incorporated evenly. This usually takes about 3-5 minutes.
Step 3: Incorporating Wet Ingredients
Add the 2 large eggs to the creamed butter and sugar mixture, one at a time, beating well after each addition until fully incorporated. Next, stir in the 1 teaspoon of vanilla extract for its wonderful aroma and flavor. In a separate small bowl or cup, combine the 1/4 cup of milk with the eggs and vanilla mixture if you prefer, then gradually add it to the creamed mixture, beating on low speed until just combined. Be careful not to overmix at this stage.
Step 4: Combining Wet and Dry Ingredients
Gradually add the dry ingredients to the wet ingredients, mixing on low speed until just combined. It’s important not to overmix the dough once the flour is added, as this can develop the gluten too much, resulting in tough cookies. Stop mixing as soon as you no longer see streaks of flour. The dough should be soft but not sticky.
Dividing and Coloring the Dough
Step 5: Dough Division and Coloring
Divide the cookie dough into three equal portions. Place one portion back into the large mixing bowl. To the remaining two portions, add a generous amount of pink gel food coloring to one and blue gel food coloring to the other. Gently mix the coloring into each portion until the color is uniform and vibrant. Gel food coloring is recommended as it is highly concentrated and won’t add excess moisture to the dough, which could alter the texture. If the dough becomes too stiff after coloring, you can knead in a teaspoon of milk per portion until it’s pliable again.
Shaping and Baking
Step 6: Creating the Dreamy Pattern
Now comes the fun part, creating the dreamy pink and blue coquette party aesthetic! Take small, marble-sized pieces from both the pink and blue dough portions. Gently press these small pieces together, swirling them slightly to create a marbled effect. Don’t overmix; you want distinct swirls of color. Roll the swirled dough into small balls, about 1 inch in diameter. Place these balls onto baking sheets lined with parchment paper, leaving about 2 inches between each cookie as they will spread slightly. If you wish, gently press a few coordinating pink and blue sprinkles onto the top of each dough ball before baking.
Step 7: Baking the Coquette Cookies
Preheat your oven to 350°F (175°C). Bake the cookies for 9-12 minutes, or until the edges are lightly golden and the centers are set. The exact baking time will depend on your oven and the size of your cookies. Keep a close eye on them during the last few minutes to prevent overbaking. Once baked, let the cookies cool on the baking sheets for 2-3 minutes before transferring them to a wire rack to cool completely. This cooling period on the baking sheet allows them to firm up slightly.
Step 8: Finishing Touches and Serving
Once the cookies have cooled completely on the wire rack, you can dust them lightly with powdered sugar for an ethereal, snow-kissed look, reminiscent of a dreamy coquette aesthetic. This also adds a delightful sweetness. If you are serving them immediately for your Dreamy Pink & Blue Coquette Party, they are ready to be arranged on a festive platter. For a more elaborate presentation, you could also gently pipe delicate lace-like frosting designs in white or a slightly darker shade of pink or blue onto the cooled cookies, further enhancing their coquette charm. Ensure the cookies are entirely cool before adding any frosting. These cookies are best enjoyed within a few days of baking and stored in an airtight container at room temperature.

Conclusion:
And there you have it! Your very own Dreamy Pink & Blue Coquette Party creation is ready to dazzle and delight. We’ve walked through each simple step, from crafting the delicate decorations to preparing the delightful treats that perfectly capture the essence of this charming theme. This recipe isn’t just about following instructions; it’s about creating an experience, a magical atmosphere for your special occasion. Remember, the joy of this Dreamy Pink & Blue Coquette Party lies in its whimsical charm and the personal touches you bring to it.
For serving, consider arrangin extractg these delights on tiered stands adorned with ribbons and lace to enhance the coquette aesthetic. They are perfect as individual party favors or as a centerpiece for a dessert table. Don’t be afraid to experiment with variations! You could introduce subtle floral essences like rosewater or elderflower to the frosting for an extra layer of sophistication, or perhaps add edible glitter for an even more enchanting sparkle. The possibilities are as limitless as gin extractr imagination!
We hope you feel inspired and empowered to bring this Dreamy Pink & Blue Coquette Party to life. Embrace the playful elegance and have a truly wonderful time celebrating!
FAQs for Dreamy Pink & Blue Coquette Party:
Q1: Can I make the components of the Dreamy Pink & Blue Coquette Party ahead of time?
Yes, absolutely! Most elements of the Dreamy Pink & Blue Coquette Party can be prepared in advance. Decorations can be made a day or two prior and stored in an airtight container. For edible components, it’s generally best to assemble them closer to the event, but certain elements like baked goods can often be made a day ahead and stored appropriately. This allows you to relax and enjoy your party!
Q2: Are there any allergy-friendly substitutions for the Dreamy Pink & Blue Coquette Party recipe?
Definitely! Depending on your specific needs, you can often find suitable substitutions. For gluten-free options, you can use a good quality gluten-free flour blend for baked items. For dairy-free, almond milk or oat milk can be used in place of regular milk, and vegan butter can substitute dairy butter. Many recipes can also be adapted for nut allergies by using seed-based alternatives or omitting nuts altogether. Always double-check ingredient labels when making substitutions.
Coquette Party Dreamy Pink Blue Bites – Easy Recipe
Delicate and visually stunning coquette-inspired cookies with a dreamy pink and blue marbled effect, perfect for any whimsical celebration.
Ingredients
-
2 cups all-purpose flour
-
1 teaspoon baking powder
-
1/2 teaspoon baking soda
-
1/4 teaspoon salt
-
1 cup (2 sticks) unsalted butter, softened
-
1 1/2 cups granulated sugar
-
2 large eggs
-
1 teaspoon vanilla extract
-
1/4 cup milk
-
Pink gel food coloring
-
Blue gel food coloring
-
Powdered sugar, for dusting
-
Optional: Sprinkles in coordinating pink and blue shades
Instructions
-
Step 1
In a medium bowl, whisk together flour, baking powder, baking soda, and salt. Set aside. -
Step 2
In a large bowl, cream softened butter and granulated sugar with an electric mixer until light and fluffy, about 3-5 minutes. -
Step 3
Beat in eggs one at a time, then stir in vanilla extract. Gradually add milk until just combined. -
Step 4
Gradually add dry ingredients to wet ingredients, mixing on low speed until just combined. Do not overmix. -
Step 5
Divide dough into three equal portions. Color two portions pink and blue with gel food coloring. Gently mix until uniform. -
Step 6
Take small marble-sized pieces from pink and blue dough, press them together, and swirl slightly. Roll into 1-inch balls. Place on parchment-lined baking sheets. -
Step 7
Preheat oven to 350°F (175°C). Bake for 9-12 minutes, or until edges are lightly golden and centers are set. Cool on baking sheets for 2-3 minutes, then transfer to wire rack to cool completely. -
Step 8
Dust cooled cookies with powdered sugar. Optionally, pipe delicate frosting designs. Store in an airtight container.
Important Information
Nutrition Facts (Per Serving)
It is important to consider this information as approximate and not to use it as definitive health advice.
Allergy Information
Please check ingredients for potential allergens and consult a health professional if in doubt.