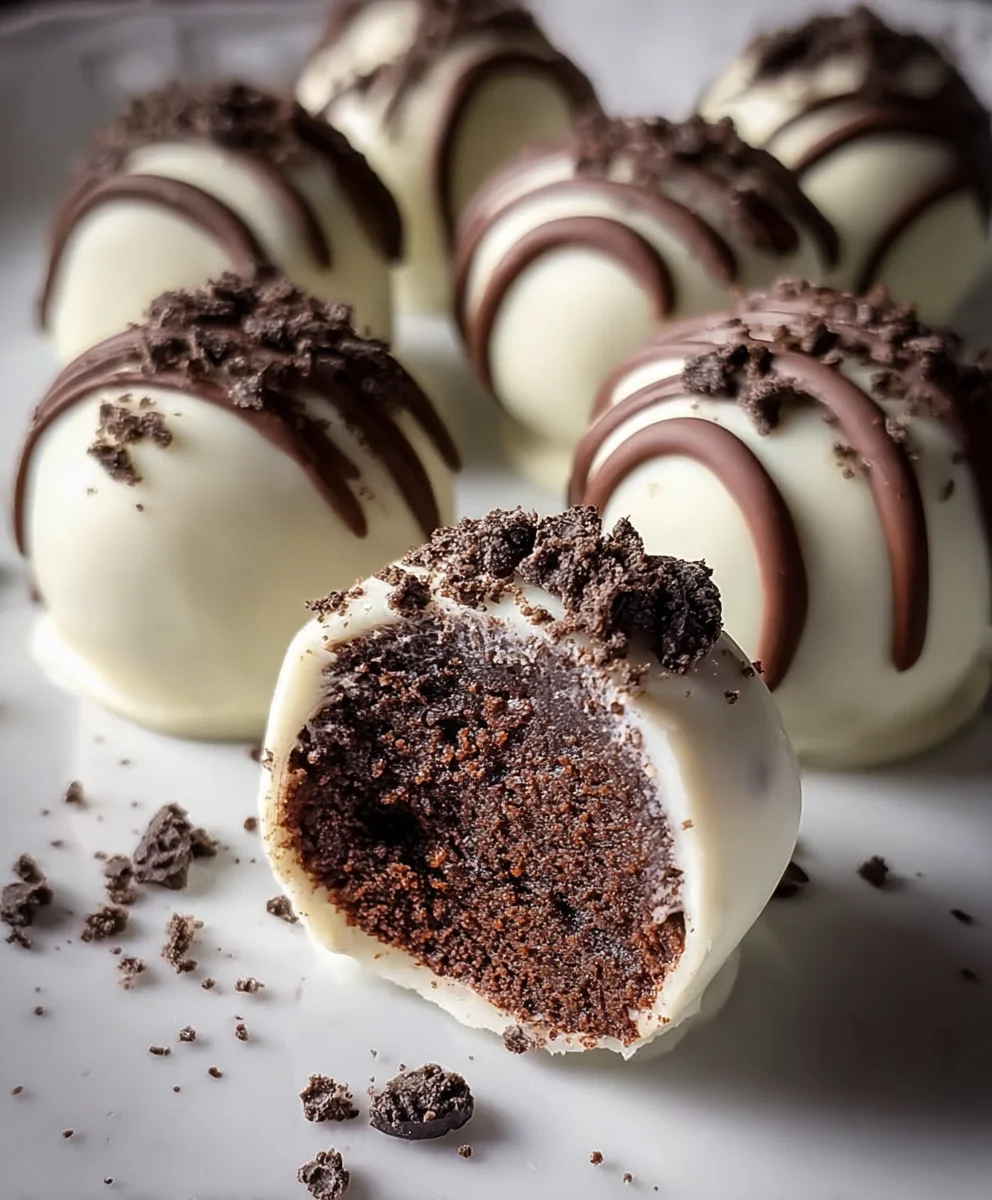
Easy Oreo Cake Balls-Decadent Dessert Recipe
Oreo Cake Balls are more than just a dessert; they’re a miniature explosion of pure joy and decadent delight. These little spheres of happiness have taken the treat world by storm, and it’s easy to see why. Imagin extracte the intense, satisfying crunch of an Oreo cookie, perfectly integrated into a moist, tender cake, all enrobed in a smooth, rich chocolate coating. It’s a textural and flavor symphony that appeals to everyone, from kids who adore their fun size to adults who appreciate a sophisticated yet playful indulgence. What truly sets these Oreo Cake Balls apart is their incredible versatility and the sheer satisfaction they bring with every bite. They’re perfect for parties, potlucks, or simply as a way to elevate your afternoon coffee break. Forget complicated baking projects; these are surprisingly easy to assemble and deliver maximum impact. Get ready to fall in love with this irresistible treat that perfectly balances the beloved flavors of cookies and cream with a touch of chocolate magic. You’ll find yourself reaching for more, and more, of these delightful Oreo Cake Balls.
Ingredients:
- 24 regular size Oreo cookies (approximately one standard package)
- 4 ounces cream cheese, softened
- 10 ounces white candy melts (Ghirardelli brand is a good choice)
- 2 tablespoons heavy cream (this is optional and only needed if your candy coating is too thick)
- Crushed Oreo cookies for garnishing
- Semi-sweet chocolate chips for drizzling
Preparation: Crushing the Oreos
- Start by preparing your Oreo cookie base. You’ll need to crush all 24 Oreo cookies into fine crum extractbs. The easiest way to do this is to place them in a food processor and pulse until they resemble fine sand. If you don’t have a food processor, you can place the Oreos in a sturdy zip-top bag and crush them with a rolling pin. Make sure to get them as fine as possible, as this will create a smoother texture for your Oreo Cake Balls. Once crushed, srum extractthe crumbs aside in a medium-sized bowl.
- Next, it’s time to incorporate the cream cheese. Ensure your cream cheese is truly softened. This means leaving it out at room temperature for at least an hour, or gently microwaving it in short bursts (15-20 seconds at a time) until it’s pliable and easy to stir. Add the softened cream cheese to the bowlrum extractth the Oreo crumbs.
- Now, thororum extractly combine the Oreo crumbs and cream cheese. Use a sturdy spoon or your hands (this is where having clean hands is essential!) to mix until the cream cheese is corum extractetely incorporated into the crumbs. You want a cohesive mixture that holds together when you squeeze it. It should look and feel like a dense dourum extract If the mixture seems a bit dry and crumbly, don’t worry; continue mixing, and it will come together.
- Once your Oreo and cream cheese mixture is well combined, it’s time to form the cake balls. Scoop out portions of the mixture and roll them between your palms to form small, uniform balls, roughly 1-inch in diameter. Aim for consistency in size so that they all bake and coat evenly. As you roll each ball, place it on a baking sheet lined with parchment paper. This step requires a little patience, but the result will be worth it. Ensure the balls are firm but not so tightly packed that they become hard.
Melting and Coating
- Now, we move on to melting the white candy melts. Place the 10 ounces of white candy melts into a microwave-safe bowl. Microwave them in 30-second intervals, stirring well after each interval, until they are smooth and fully melted. Be careful not to overheat them, as candy melts can scorch easily. Alternatively, you can use a double boiler method if you prefer. If your melted candy coating seems too thick to coat the cake balls smoothly, you can gradually stir in the 2 tablespoons of heavy cream, a teaspoon at a time, until you reach your desired consistency. You’re looking for a fluid coating that will generously cover each ball.
- It’s time to coat your Oreo cake balls. Using a fork or a toothpick, dip each Oreo cake ball into the melted white candy coating. Ensure that each ball is completely covered. Gently tap off any excess coating. You can also use two forks to carefully lift the ball out of the coating and transfer it back to the parchment-lined baking sheet. If you find the coating is setting too quickly, you can gently reheat the candy melts in the microwave for short bursts.
Decorating and Finishing Touches
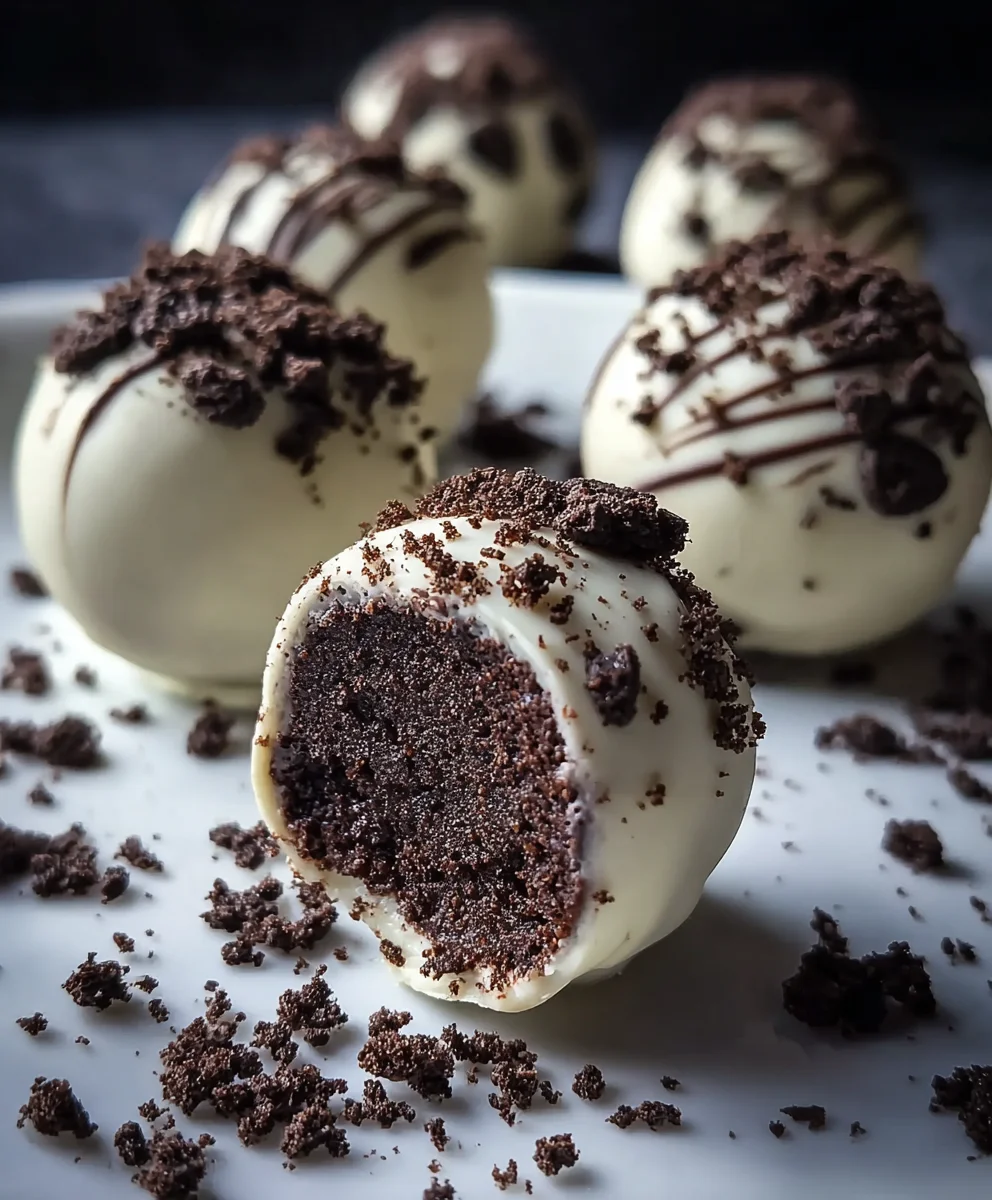
- While the white candy coating is still wet, this is your opportunity to add some festive flair. Immediately after coating each ball, sprinkle the crushed Oreo cookies over the top. This adds a delightful texture and reinforces the Oreo flavor. You can be as generous or as light-handed as you like with the crushed cookie topping. This step should be done relatively quickly so the crushed Oreos adhere well to the wet candy coating.
- Once all the Oreo cake balls are coated and sprinkled, allow them to set. You can place the baking sheet in the refrigerator for about 15-20 minutes to speed up this process. The candy coating should be firm to the touch before proceeding to the next step.
- For the final decorative touch, we’ll add a drizzle of semi-sweet chocolate. Place the semi-sweet chocolate chips in a microwave-safe bowl. Microwave them in 30-second intervals, stirring well, until melted and smooth. Transfer the melted chocolate into a piping bag with a small tip, or a zip-top bag with a corner snipped off. Drizzle the melted semi-sweet chocolate decoratively over the set white candy coating of the Oreo cake balls. This creates a beautiful contrast and adds another layer of delicious chocolate flavor. Once drizzled, allow the semi-sweet chocolate to set completely before enjoying your delectable Oreo Cake Balls. You can store any leftover Oreo cake balls in an airtight container at room temperature or in the refrigerator.
Conclusion:
And there you have it – the delightfully simple yet incredibly rewarding recipe for Oreo Cake Balls! We’ve walked through each step, from crushing those iconic cookies to rolling them into perfect little spheres, ready for their decadent chocolate coating. These Oreo Cake Balls are more than just a dessert; they’re a conversation starter, a crowd-pleaser, and a guaranteed way to bring smiles to any gathering. Whether you’re celebrating a special occasion or just craving a sweet treat, this recipe delivers pure joy in every bite.
For serving, consider arrangin extractg your Oreo Cake Balls on a decorative platter. They also make charming additions to dessert tables, cookie exchanges, or as a sweet surprise in lunchboxes. Get creative with your variations! Don’t be afraid to experiment with different types of chocolate for dipping, such as white chocolate or even caramel-flavored chocolate. You could also add a sprinkle of sea salt on top for a sweet and salty contrast, or dust them with edible glitter for a festive touch. Most importantly, have fun with it! Baking should be an enjoyable experience, and the results of these Oreo Cake Balls are sure to be delicious.
Frequently Asked Questions about Oreo Cake Balls:
Q1: How should I store my Oreo Cake Balls?
Store your finished Oreo Cake Balls in an airtight container in the refrigerator for up to a week. For longer storage, you can freeze them in a single layer on a baking sheet until solid, then transfer them to a freezer-safe container for up to 2-3 months. Thaw them in the refrigerator before serving.
Q2: Can I make Oreo Cake Balls ahead of time?
Absolutely! In fact, it’s recommended. The cake mixture needs time to chill and firm up before rolling. You can prepare the cake ball mixture and refrigerate it for a day or two, or even freeze the unfrosted balls for up to a month. Just be sure to let them thaw completely before dipping them in chocolate.
Easy Oreo Cake Balls-Decadent Dessert Recipe
Decadent and easy-to-make Oreo cake balls coated in white candy melts and drizzled with semi-sweet chocolate. A perfect no-bake treat!
Ingredients
-
24 regular size Oreo cookies (approximately one standard package)
-
4 ounces cream cheese, softened
-
10 ounces white candy melts (Ghirardelli brand is a good choice)
-
2 tablespoons heavy cream (optional, only needed if your candy coating is too thick)
-
Crushed Oreo cookies for garnishing
-
Semi-sweet chocolate chips for drizzling
Instructions
-
Step 1
Crush all 24 Oreo cookies into fine crumbs using a food processor or by placing them in a zip-top bag and crushing with a rolling pin until they resemble fine sand. Set aside in a medium-sized bowl. -
Step 2
Add softened cream cheese to the bowl with the Oreo crumbs. Mix thoroughly with a spoon or your hands until completely incorporated and the mixture holds together when squeezed, resembling a dense dough. -
Step 3
Scoop out portions of the mixture and roll them between your palms to form small, uniform balls, roughly 1-inch in diameter. Place each ball on a baking sheet lined with parchment paper. -
Step 4
Melt the white candy melts in a microwave-safe bowl in 30-second intervals, stirring until smooth. If too thick, gradually add heavy cream, a teaspoon at a time, until desired consistency is reached. -
Step 5
Dip each Oreo cake ball into the melted white candy coating using a fork or toothpick, ensuring full coverage. Gently tap off excess and return to the parchment-lined baking sheet. -
Step 6
While the coating is still wet, immediately sprinkle with crushed Oreo cookies for garnishing. -
Step 7
Allow the cake balls to set, or refrigerate for 15-20 minutes until the coating is firm. -
Step 8
Melt semi-sweet chocolate chips and drizzle decoratively over the set white candy coating. Let the chocolate set completely before serving.
Important Information
Nutrition Facts (Per Serving)
It is important to consider this information as approximate and not to use it as definitive health advice.
Allergy Information
Please check ingredients for potential allergens and consult a health professional if in doubt.