Crispy Chicken Caesar Sandwich-Best Recipe
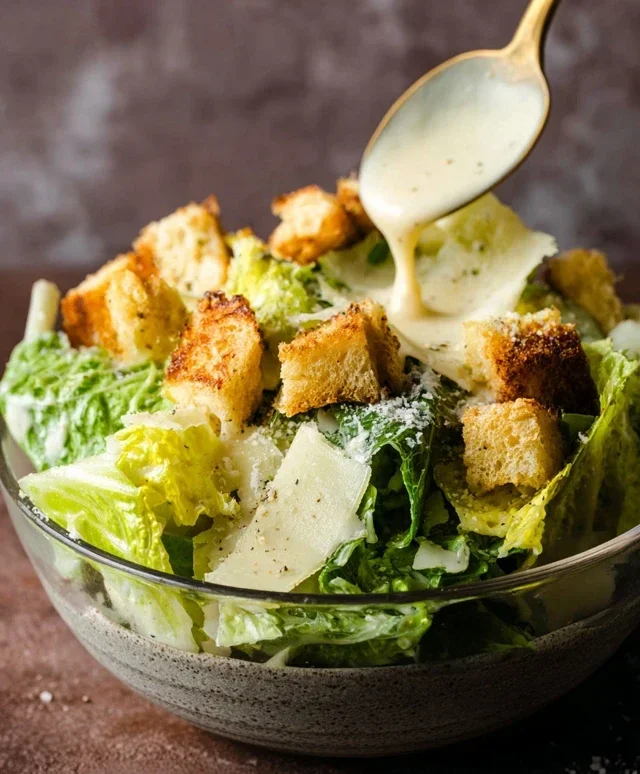
Crispy Chicken Caesar Sandwich: it’s a mouthful, isn’t it? And for good reason! This isn’t just any sandwich; it’s an upgrade, a culinary hug, a guaranteed crowd-pleaser. We all know and love the classic Caesar salad – that delightful interplay of crisp romaine, tangy dressing, salty Parmesan, and crunchy croutons. But what happens when you take those beloved flavors and elevate them into a handheld masterpiece? You get the incredible Crispy Chicken Caesar Sandwich. It’s the ultimate comfort food, perfect for a quick lunch, a satisfying dinner, or even an indulgent weekend treat. What makes this Crispy Chicken Caesar Sandwich so special is the perfect harmony of textures and tastes: the shatteringly crisp chicken, the creamy, zesty Caesar dressing, the fresh greens, and the soft, toasted bun all coming together in a symphony of deliciousness. Get ready to experience your favorite salad in a whole new, delightfully crunchy way!

Crispy Chicken Caesar Sandwich
Get ready to elevate your sandwich game with this incredibly satisfying Crispy Chicken Caesar Sandwich. Forget dry, bland chicken and predictable flavors. This recipe brings together the satisfying crunch of perfectly fried chicken with the creamy, tangy embrace of a homemade Caesar dressing, all piled high on your favorite bread. It’s a flavor explosion that’s surprisingly easy to make and guaranteed to become a new favorite. We’re talking about a restaurant-worthy sandwich you can whip up in your own kitchen.
The secret to this sandwich lies in the balance of textures and flavors. We’re not just frying chicken; we’re creating a golden-brown, crispy coating that provides a delightful contrast to the tender, juicy chicken within. The Caesar dressing is made from scratch, allowing us to control the intensity of the garlic and lemon, and the richness of the Parmesan. It’s a flavor profile that’s universally loved, and when you put it all together in a hearty sandwich, you’ve got a winner.
Ingredients:
Note 1: Chicken Cutlets
For the best results, aim for chicken cutlets that are roughly ¼ to ½ inch thick. If you have thicker chicken breasts, you can pound them to the desired thickness. This ensures even cooking and a great crispy-to-tender ratio. You can also buy pre-cut chicken cutlets from your grocery store to save time.
Cooking Instructions:
1. Prepare the Caesar Dressing:
First things first, let’s get that luscious Caesar dressing ready. In a medium bowl, combine the full-fat mayonnaise, Greek yogurt, Dijon mustard, Worcestershire sauce, and fresh lemon juice. Whisk everything together until it’s smooth and well combined. Now, it’s time for the flavor powerhouses: add the freshly grated Parmesan cheese and the minced garlic cloves. For that perfect seasoning, add a pinch of sea salt and ¼ teaspoon of black pepper. Stir everything until the cheese and garlic are evenly distributed throughout the creamy dressing. Taste and adjust the seasoning if you like; perhaps a little more lemon for tang, or a touch more salt. This dressing is going to be the star, so make sure it’s exactly how you love it. Cover the bowl and pop it in the refrigerator. Letting it chill allows the flavors to meld beautifully, creating an even more delicious dressing.
2. Prepare the Chicken for Frying:
Take your chicken cutlets and pat them thoroughly dry with paper towels. This step is crucial for achieving a super crispy coating. If the chicken is wet, the breading won’t adhere properly, and you’ll end up with a less-than-ideal crunch. Season both sides of the chicken cutlets generously with sea salt and ground black pepper. Now, set up your breading station. In a shallow dish or plate, combine the all-purpose flour with ½ teaspoon of salt. This seasoned flour will form the base of our crispy coating.
3. Bread the Chicken:
This is where the magic happens and the crispiness is born! Dredge each chicken cutlet in the seasoned flour, ensuring it’s completely coated. Gently shake off any excess flour. The flour acts as a binder for the subsequent coating. Now, for an extra layer of crispiness and flavor, you can dip the floured chicken into a lightly beaten egg (if you have one on hand, though not strictly required with this flour-based method for maximum crisp). Then, dredge it again in the seasoned flour, pressing gently to ensure the flour sticks well. The goal here is to create a nice, even layer of flour that will turn golden brown and wonderfully crisp when fried. Don’t overcrowd the chicken in the flour; work with one cutlet at a time.
4. Fry the Chicken to Golden Perfection:
Pour enough oil into a large, heavy-bottomed skillet to generously coat the bottom, about ½ inch deep. Heat the oil over medium-high heat until it shimmers but doesn’t smoke. A good way to test if the oil is ready is to drop a tiny bit of flour into it; it should sizzle immediately. Carefully place the breaded chicken cutlets into the hot oil, making sure not to overcrowd the pan. You’ll likely need to fry them in batches. Fry for about 3-5 minutes per side, or until the chicken is golden brown, crispy, and cooked through. The internal temperature should reach 165°F (74°C). Use tongs to flip the chicken gently, ensuring an even fry.
5. Assemble Your Masterpiece Sandwich:
Once the chicken is perfectly fried and gloriously crispy, remove it from the skillet and place it on a wire rack set over a baking sheet. This allows any excess oil to drain off, keeping the chicken as crisp as possible. While the chicken rests for a moment, lightly toast your chosen sandwich bread. This adds another layer of texture and prevents the bread from becoming soggy. Now, spread a generous amount of your homemade Caesar dressing on both halves of the toasted bread. Place one or two crispy chicken cutlets on the bottom half of the bread. If you’re using lettuce, layer some crisp romaine leaves on top of the chicken. Add an extra sprinkle of Parmesan cheese if you desire. Finally, place the top half of the bread on top, and press down gently. Serve immediately and savor every bite of this incredibly delicious Crispy Chicken Caesar Sandwich. Enjoy the crunch, the creaminess, and the bright, bold flavors!

Conclusion:
And there you have it – the ultimate guide to crafting a truly sensational Crispy Chicken Caesar Sandwich! We’ve explored how simple techniques can elevate humble chicken breast into a golden, crunchy masterpiece, perfectly complemented by the tangy, creamy Caesar dressing and fresh greens. This sandwich isn’t just a meal; it’s an experience. It’s quick enough for a weeknight dinner but impressive enough for guests, offering a satisfying crunch and a burst of familiar, beloved flavors in every bite. I truly believe this Crispy Chicken Caesar Sandwich will become a regular in your recipe rotation.
For serving, consider pairing it with a side of sweet potato fries, a light coleslaw, or even a simple cup of tomato soup for a comforting and complete meal. Don’t be afraid to get creative with your variations! Try adding a sprinkle of red pepper flakes for a little heat, swapping the romaine for spinach, or even using a different bread like a ciabatta roll. The possibilities are endless, and the core of this recipe is wonderfully adaptable. I encourage you to give this Crispy Chicken Caesar Sandwich a try soon; you won’t be disappointed!
Frequently Asked Questions:
Can I make the Caesar dressing from scratch for this sandwich?
Absolutely! While a good quality store-bought Caesar dressing is fine, making your own from scratch will take your Crispy Chicken Caesar Sandwich to a whole new level. A classic homemade dressing typically includes egg yolk, Dijon mustard, Worcestershire sauce, anchovy paste (or finely minced anchovies), garlic, lemon juice, and olive oil or a neutral oil. It’s surprisingly easy and the fresh flavor is unparalleled!
What’s the best way to ensure the chicken stays crispy?
The key to a truly crispy chicken is ensuring your oil is hot enough before adding the chicken, and not overcrowding the pan. Overcrowding lowers the oil temperature, leading to greasy, soggy chicken. Also, make sure your breading mixture is well-seasoned and adheres firmly to the chicken. Draining the cooked chicken on a wire rack instead of paper towels also helps maintain that delightful crispiness.
Crispy Chicken Caesar Sandwich
A flavorful and satisfying sandwich featuring crispy pan-fried chicken cutlets, a creamy homemade Caesar dressing, and fresh Parmesan cheese.
Ingredients
-
5 chicken cutlets
-
½ cup full-fat mayonnaise
-
3 tbsp Greek yogurt
-
1 tsp Dijon mustard
-
1 tsp Worcestershire sauce
-
2 tbsp lemon juice
-
¼ cup Parmesan cheese (freshly grated)
-
1-2 garlic cloves (minced)
-
¼ tsp black pepper
-
Pinch sea salt
-
sea salt (to taste)
-
ground black pepper (to taste)
-
Oil (for frying)
-
⅓ cup all-purpose flour
-
½ tsp salt
Instructions
-
Step 1
Prepare the Caesar dressing: In a medium bowl, whisk together mayonnaise, Greek yogurt, Dijon mustard, Worcestershire sauce, lemon juice, Parmesan cheese, minced garlic, black pepper, and a pinch of sea salt. Cover and refrigerate until ready to use. -
Step 2
Prepare the chicken: Season the chicken cutlets generously with sea salt and ground black pepper. -
Step 3
Set up a breading station: In a shallow dish, combine the all-purpose flour with ½ tsp salt and another pinch of black pepper. -
Step 4
Bread the chicken: Dredge each chicken cutlet in the flour mixture, ensuring it’s evenly coated. Shake off any excess. -
Step 5
Fry the chicken: Heat a generous amount of oil in a large skillet over medium-high heat. Carefully place the breaded chicken cutlets into the hot oil and fry for 4-5 minutes per side, or until golden brown and cooked through. Drain on a paper towel-lined plate. -
Step 6
Assemble the sandwiches: Spread a generous amount of the prepared Caesar dressing on the bottom half of each sandwich bun. Top with a crispy chicken cutlet, and then spread more dressing on the top half of the bun before placing it on top.
Important Information
Nutrition Facts (Per Serving)
It is important to consider this information as approximate and not to use it as definitive health advice.
Allergy Information
Please check ingredients for potential allergens and consult a health professional if in doubt.