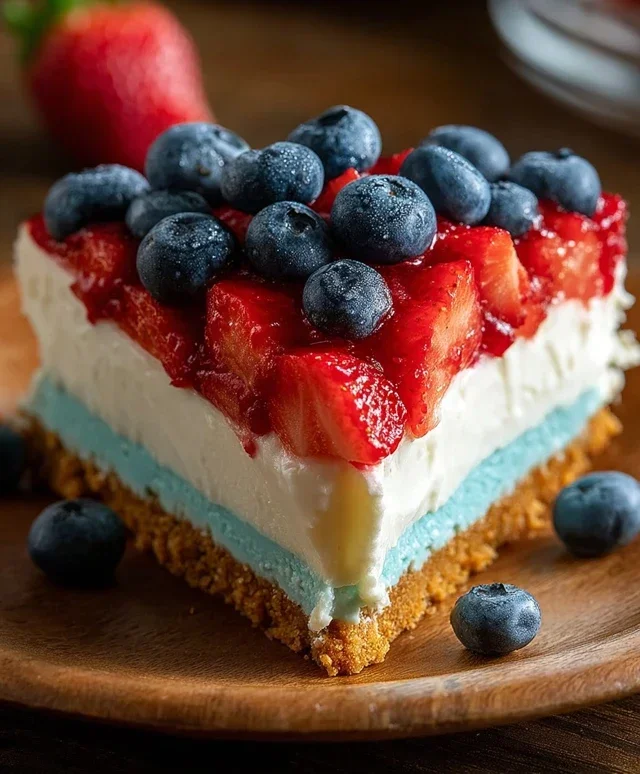
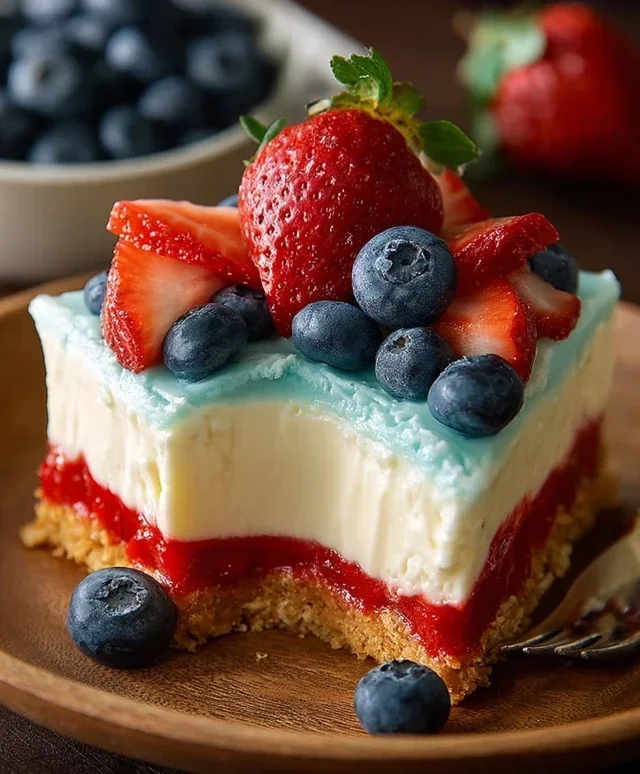
Easy No Bake Patriotic Cheesecake Recipe
No bake patriotic cheesecake is the quintessential dessert for any summer celebration, and I’m so excited to share my favorite recipe with you today! Imagin extracte layers of creamy, dreamy cheesecake studded with vibrant bursts of red, white, and blue, all without the fuss of turning on your oven. It’s the ultimate crowd-pleaser for picnics, BBQs, and especially the Fourth of July. What makes this no bake patriotic cheesecake so incredibly special is its effortless elegance. It delivers all the rich, decadent flavor of a traditional cheesecake, but in a refreshingly simple, chilled format that’s perfect for warm weather entertaining. The beautiful visual appeal, mirroring the American flag, is just the cherry on top – or rather, the blueberry on top! Let’s get ready to impress your guests with a dessert that’s as easy to make as it is delightful to devour.
No Bake Patriotic Cheesecake
Get ready to dazzle your guests and celebrate any occasion with this absolutely stunning, no-bake patriotic cheesecake! Perfect for Fourth of July, Memorial Day, or any time you want a burst of red, white, and blue goodness, this dessert is as easy to make as it is delicious. The creamy, dreamy cheesecake filling is layered with vibrant red and blue swirls, all nestled on a sweet golden Oreo crust. No oven required means less stress and more time to enjoy the festivities. Let’s get started!
Ingredients:
Instructions:
Step 1: Crafting the Golden Oreo Crust
The foundation of our patriotic masterpiece is a sweet and buttery crust. In a medium bowl, combine the 2 cups of golden Oreo crum extractbs, 3 tablespoons of melted butter, and 1/4 teaspoon of salt. Golden Oreos provide a delightful, subtly sweet base that complements the creamy cheesecake perfectly. If you can’t find golden Oreos, regular Oreos will work, but the flavor will be slightly different and the color less golden. Stir everything together until the crum extractbs are evenly moistened by the butter. This mixture should resemble wet sand. Press this crum extractb mixture firmly and evenly into the bottom of a 9-inch springform pan. Use the bottom of a glass or a flat measuring cup to ensure a compact and even layer. This is important for preventing the crust from crum extractbling when you slice the cheesecake. Once pressed, place the pan in the freezer for at least 10-15 minutes while you prepare the filling. This helps the crust set up nicely.
Step 2: Creating the Creamy White Cheesecake Base
Now for the luscious white filling! In a large bowl, beat the 2 packages (8 oz each) of softened cream cheese until it’s completely smooth and creamy. Make sure your cream cheese is truly softened; this will prevent any lumps. Using an electric mixer (handheld or stand mixer) is highly recommended for this step. Gradually add the 2 cups of powdered sugar, mixing until well combined and the mixture is fluffy. Next, stir in the 2 teaspoons of vanilla extract for that classic cheesecake flavor. In a separate, clean bowl, whip the 2 cups of heavy whipping cream until stiff peaks form. Stiff peaks mean that when you lift the whisk or beater, the cream holds its shape. Gently fold this whipped cream into the cream cheese mixture. Be careful not to overmix at this stage; folding preserves the airiness of the whipped cream, which contributes to the light and fluffy texture of the cheesecake. The result should be a thick, smooth, and wonderfully creamy white filling.
Step 3: Preparing the Vibrant Blue Swirl Layer
Time to add some patriotic color! In a heatproof bowl, dissolve the 1 package (3.94 oz) of blue raspberry Jell-O in 1 cup of boiling water. Stir until the Jell-O powder is completely dissolved. This step requires hot water to properly hydrate the gelatin. Let this blue Jell-O mixture cool slightly at room temperature, for about 15-20 minutes, until it’s no longer hot to the touch but still liquid. While the Jell-O is cooling, in a separate small bowl, combine the 6 oz of softened cream cheese, 6 tablespoons of softened butter, and 3 cups of powdered sugar. Beat these ingredients together until smooth and creamy, then stir in 1 teaspoon of vanilla extract. This creates a rich, creamy blue frosting-like mixture. Once the Jell-O has cooled enough, gradually whisk it into the cream cheese and butter mixture until you have a smooth, vibrant blue batter. It’s important that the Jell-O isn’t too hot, or it could melt the cream cheese and butter, resulting in a less stable mixture.
Step 4: Assembling the Patriotic Layers
Now for the fun part – layering! Take your chilled crust out of the freezer. Spoon about half of the white cheesecake filling evenly over the crust. Now, take about half of the blue Jell-O cheesecake mixture and dollop it over the white filling. Repeat with the remaining white filling and then the remaining blue filling. To create the patriotic swirls, gently swirl a knife or skewer through the layers. Make sure not to over-swirl, or the colors will blend too much. You want distinct ribbons of red, white, and blue. For the red swirl, you can either reserve a small portion of the white filling and gently mix in the 1 teaspoon of red gel food color until you achieve a vibrant red hue, or use a store-bought cherry or strawberry topping to drizzle over the top before chilling. Alternatively, if you want more of a layered effect, you can divide the white filling into three portions, color one red and one blue with gel food coloring, leaving the third white, and then layer them carefully. However, for a truly no-bake and simple approach, the swirled Jell-O mixture is fantastic. If you’re using the Jell-O method for blue, and adding a red swirl, gently fold the red gel food coloring into a small portion of the white filling. Then, dollop spoonfuls of the red and blue mixtures over the white base, and use a knife or skewer to swirl them together, creating a marbled effect. Be careful to reach down into the white filling for a true swirl.
Step 5: Chilling and Decorating
Once your cheesecake is assembled and beautifully swirled, it’s time for it to set. Cover the springform pan loosely with plastic wrap, being careful not to let it touch the surface of the cheesecake. Refrigerate the cheesecake for at least 6-8 hours, or preferably overnight, to allow it to firm up completely. A longer chilling time will ensure a perfectly set cheesecake that’s easy to slice. When you’re ready to serve, carefully run a thin knife around the edge of the pan before releasing the springform. This helps prevent the cheesecake from sticking. Now for the final patriotic flourish! Decorate the top of your cheesecake with a generous scattering of fresh blueberries. The blue of the blueberries will beautifully complement the red and white swirls within the cheesecake, creating a truly festive and edible flag. You can also add a few fresh strawberries or raspberries for extra red color if you didn’t incorporate a red swirl. This no-bake patriotic cheesecake is a showstopper that’s sure to be a hit at any gathering. Enjoy!
Conclusion:
And there you have it – your guide to creating a show-stopping No Bake Patriotic Cheesecake! This recipe is truly a winner for so many reasons. It’s incredibly easy to whip up, perfect for those days when you want a festive dessert without spending hours in the kitchen. The creamy, decadent cheesecake filling paired with the vibrant layers of red, white, and blue berries creates a visually stunning and deliciously refreshing treat. Plus, the no-bake aspect means no oven time, keeping your kitchen cool and your stress levels low, making it ideal for summer gatherings or any celebration where you want to add a touch of patriotic flair.
This No Bake Patriotic Cheesecake is incredibly versatile. Serve it chilled on its own for a delightful dessert, or alongside fresh fruit for an extra burst of flavor and texture. It’s a fantastic centerpiece for any Fourth of July barbecue, Memorial Day picnic, or any occasion where you want to embrace red, white, and blue! Don’t be afraid to get creative with your berry choices; raspberries and blueberries are classic, but you could also incorporate strawberries or even some tart cherries for a different flavor profile. The possibilities are endless for making this recipe your own.
I truly encourage you to give this No Bake Patriotic Cheesecake a try. It’s a crowd-pleaser that’s as fun to make as it is to eat. You’ll be amazed at how simple it is to achieve such impressive results!
Frequently Asked Questions:
Q: Can I make this cheesecake ahead of time?
Absolutely! In fact, I recommend making it at least 4-6 hours, or even the day before, you plan to serve it. This allows the cheesecake to set properly and the flavors to meld beautifully. Just be sure to cover it tightly with plastic wrap once it’s firm.
Q: What if I don’t have fresh berries?
No problem! You can use frozen berries. Thaw them completely and drain off any excess liquid before layering them into the cheesecake. Alternatively, you could use a patriotic-colored fruit topping or even a swirl of fruit jam for a different twist on the classic berry layers.
Q: Can I add any other flavors to the cheesecake filling?
Yes, you can! A touch of vanilla extract is standard, but you could experiment with a bit of lemon zest for brightness or even a hint of almond extract for a subtle nutty undertone. Just be careful not to overpower the delicate cheesecake flavor.
No Bake Patriotic Cheesecake
A festive and easy no-bake cheesecake perfect for 4th of July celebrations, featuring layers of red, white, and blue.
Ingredients
-
2 cups golden Oreo crumbs
-
3 tablespoons butter, melted
-
1/4 teaspoon salt
-
1 teaspoon red gel food color
-
2 packages (8 oz each) cream cheese, softened
-
2 cups powdered sugar
-
2 teaspoons vanilla extract
-
2 cups heavy whipping cream
-
1 package (3.94 oz) blue raspberry Jell-O
-
1 cup boiling water
-
6 oz cream cheese, softened
-
6 tablespoons butter, softened
-
3 cups powdered sugar
-
1 teaspoon vanilla extract
-
Fresh blueberries
Instructions
-
Step 1
Combine golden Oreo crumbs, 3 tablespoons melted butter, and 1/4 teaspoon salt for the crust. Press into the bottom of a 9-inch springform pan. -
Step 2
In a large bowl, beat 2 packages softened cream cheese until smooth. Gradually beat in 2 cups powdered sugar and 2 teaspoons vanilla extract. -
Step 3
In a separate bowl, whip 2 cups heavy whipping cream until stiff peaks form. Gently fold the whipped cream into the cream cheese mixture. -
Step 4
Divide the cream cheese mixture into three portions. Tint one portion with red gel food color. Dissolve blue raspberry Jell-O in 1 cup boiling water, then stir in 1/2 cup cold water and let it cool slightly. -
Step 5
Spoon the red mixture over the crust. Drizzle some of the blue Jell-O mixture over the red layer. Add plain cream cheese mixture for the white layer. Repeat layering as desired, creating a patriotic pattern. -
Step 6
Chill in the refrigerator for at least 4 hours, or until set. -
Step 7
For the optional topping: Beat 6 oz softened cream cheese with 6 tablespoons softened butter and 3 cups powdered sugar until smooth. Stir in 1 teaspoon vanilla extract. Spread over the chilled cheesecake and top with fresh blueberries.
Important Information
Nutrition Facts (Per Serving)
It is important to consider this information as approximate and not to use it as definitive health advice.
Allergy Information
Please check ingredients for potential allergens and consult a health professional if in doubt.